Introduction
Maybe I'm alone is saying there's something about one's desk. The right desk can send a message, make a statement or simply just let someone know you mean business. Now what we are about to talk about, isn't one of those desks. Honestly, I've never had one of those desks and probably never will. Cheap and simple always seem to win out when it comes time to find a new one. At least until this one.
That 'thing' I called a desk was becoming dangerous. Both for me and my devices. Screws were coming loose from the wall, causing it to sag in spots. It was getting scary, so needless to say it was time to upgrade. I admit, I looked at one of those desks I mentioned previously, but I knew I'd never be willing to come up with the cash for something real. So what's the next best thing? Build it myself!
Now, I'll be the first to admit, I'm not a master carpenter...though I may secretly wish I was... however, I've been around a saw or two in my life and I love building things. So I couldn't wait to get started. If this kind of thing suits you, hang out, grab your beverage of choice and let me tell you how I built my custom desk.
It all starts with a plan
Perhaps one of the more enjoyable parts of a woodworking project, for me, is making the plans. I go way too far with my plans. Guaranteed to be drawn in a vector program and to scale! I'm grinning just thinking about it. This project wasn't any different, perhaps worse than the last, but I don't like to waste time or money. So a good plan can help save both. I started looking around online at what other's had built. One of the videos I ended up finding on YouTube from Jeremy Siers, 'Build Your Own Custom All Wood Desk Top' was awesome and though he went a different route with the base, I followed his directions pretty much to the letter for my desktop. Thank you Jeremy!
I have to confess, I'm an Adobe Illustrator addict and not just for this type of project. I'm sure there are a thousand better options for doing what I do, but the biggest thing all of them have against them... they aren't Illustrator. See, me and Illustrator, we go way back and we know each other well. So it's always easier and faster for me to get it done and get the saws running.
Now this is where I tell you the drawer portion of my plans were drawn using Affinity Designer. Lol, I know, preach about Illustrator only to tell you that I used something else. At the time I needed the drawer portion, I only had Affinity Designer installed on my machine at home and I thought I would be able to replace Adobe with Affinity. It didn't work out. Nonetheless, what little I needed to do, I was able to get it done exactly the same as I would have in Illustrator in Designer.
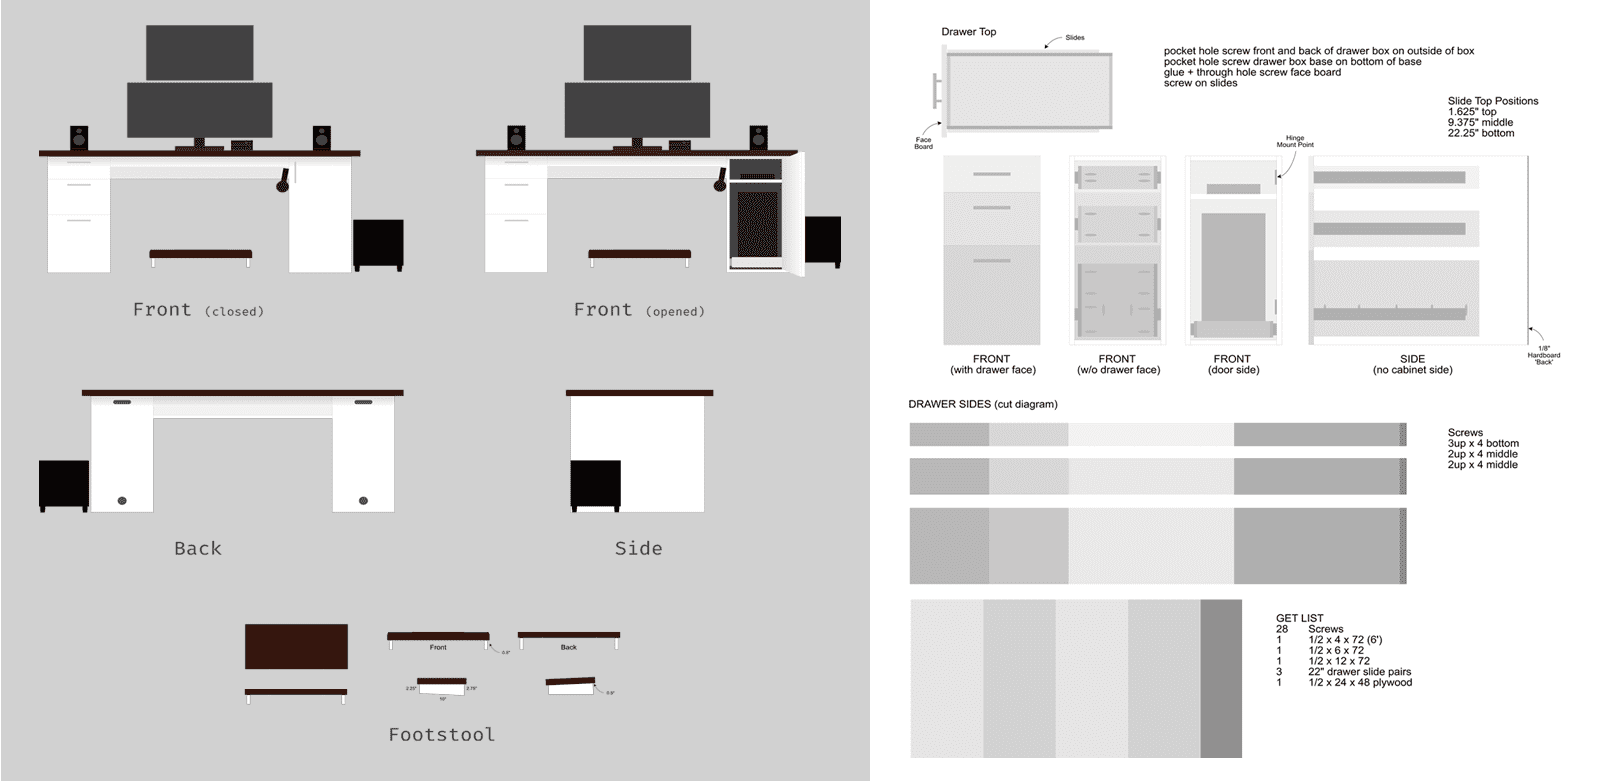
One thing to note here, I didn't start with a blank page and end with the place you see below. Rather, I started with the desk top. At that point in this plan, I wasn't building the desk that I ended up building. It wasn't until the desk build progressed that the plan had to adapt. There were a few revisions or additions to the plan as I went. From the cabinets to the drawers to even the foot stool (Oh yes! There's a foot stool), each were technically additions that weren't planned. Clearly, this desk build got out of hand, lol.
First things first, the desktop!
As I mentioned above, I followed Jeremy Siers video on building the desktop. His technique (I'm sure shared by many others) is simple and cheap and the final result is a beautiful desk (or table) top. His plan uses 2x6 boards that laid flat and attached to each other. This meant finding the flattest board possible was important when I visited the lumber store. Let's just say, I spent way too much time digging way too deep into that stack of boards looking for the perfect 6 boards. Sadly, I later found, I did not succeed, but it wasn't anything too bad.
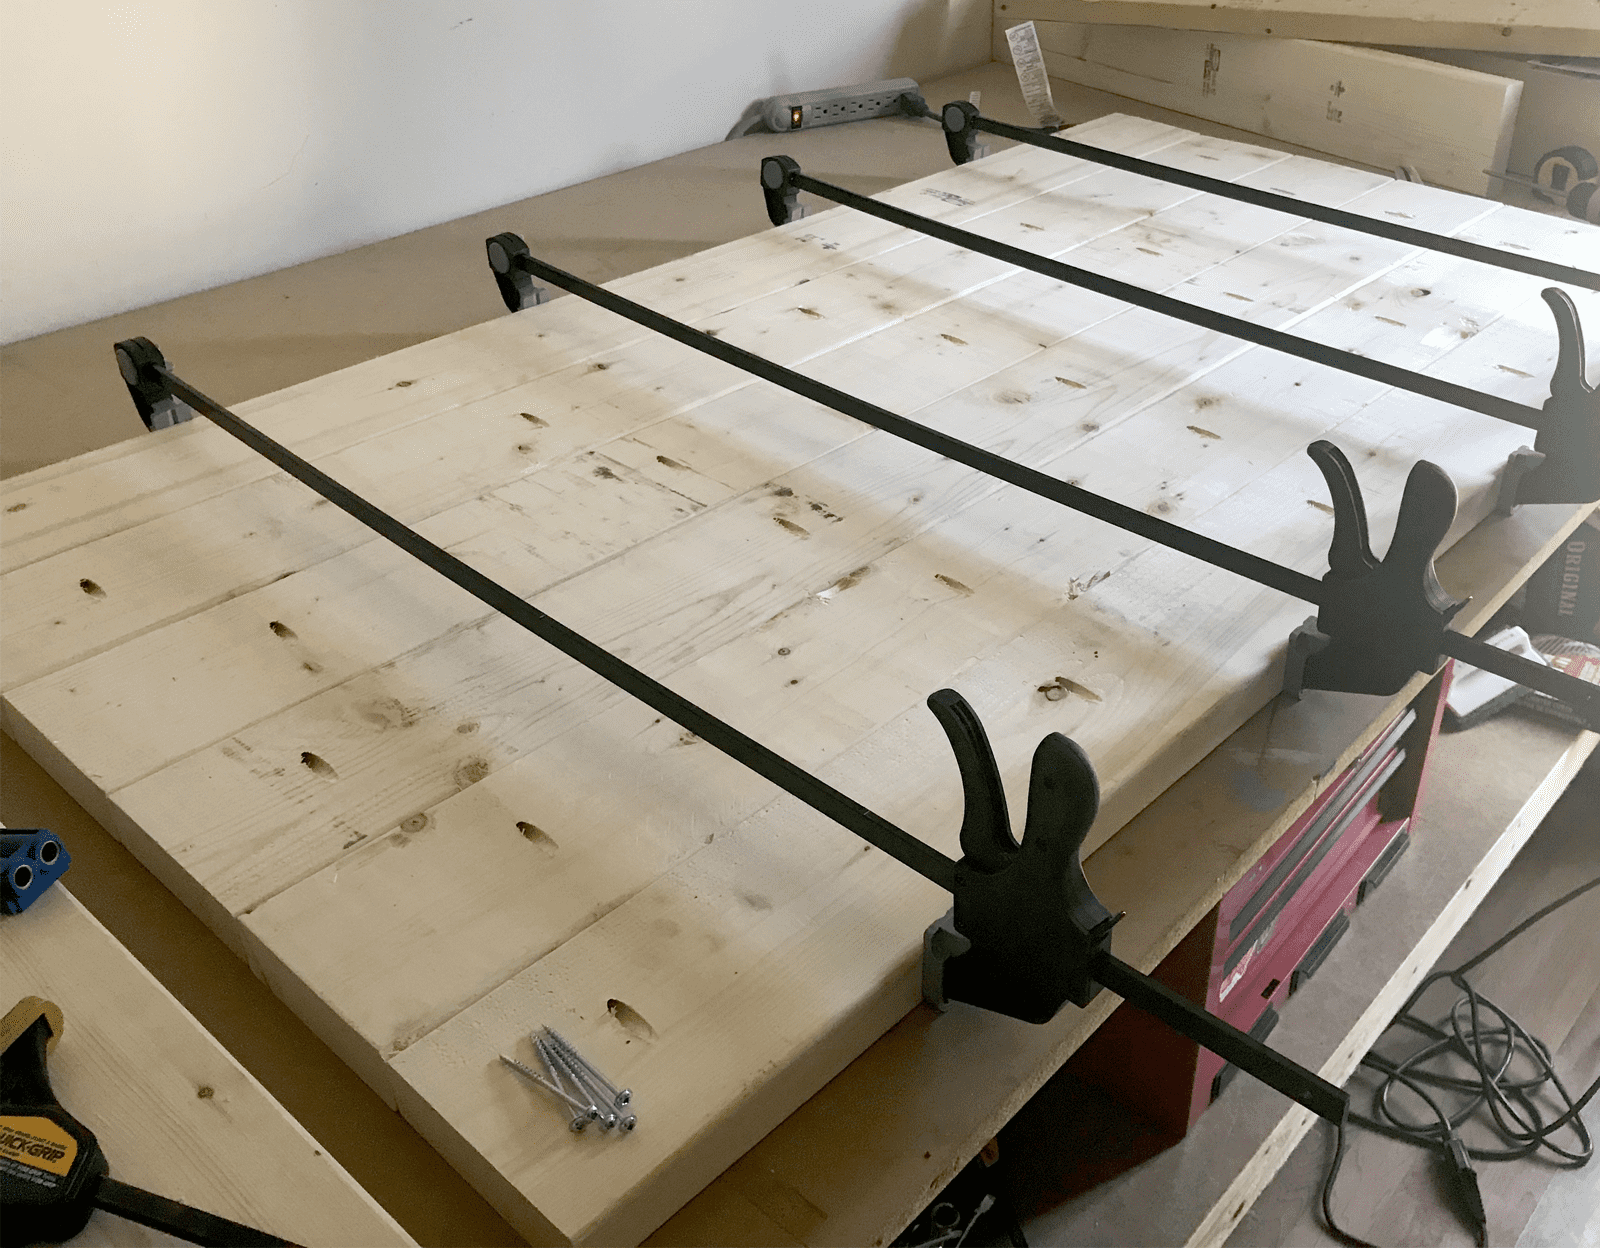
Each of these boards were trimmed down to 61" using a much older version of this Ryobi 10" Compound Miter Saw. I put the scraps to the side, as I would return to them later to cut the sandwich boards that go on either end of the desktop. Using the Kreg® Pocket Hole Jig I pre-drilled a lot of pocket holes. I then attached each board to the next using Kreg® Pocket Hole Screws (1.5", course thread) and TiteBond Original Wood Glue. To allow the glue to set, I used four 36" Pittsburgh Ratcheting Bar Clamps to hold everything in place.
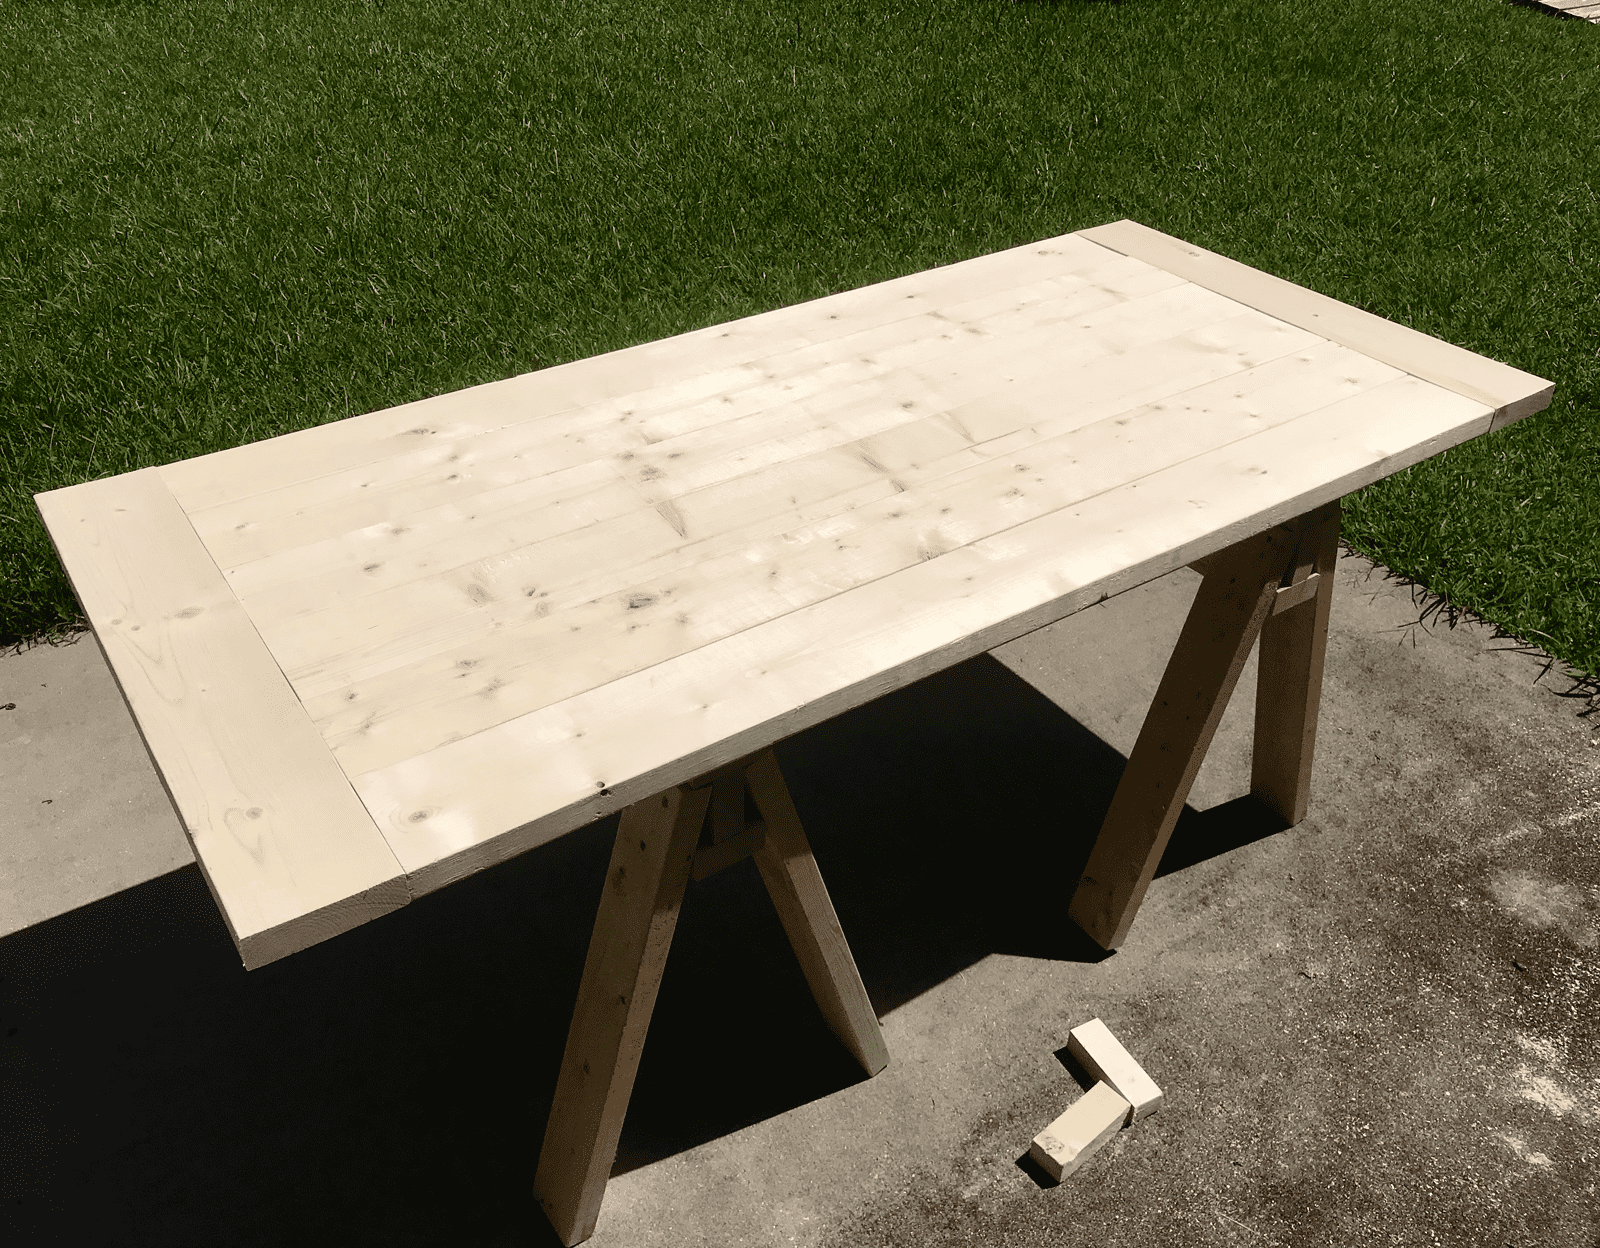
While the glue set on the center section, I returned to a couple pieces of those scrap 2x6's. Using the center section as a guide, I marked each board to what would be the depth of the desktop. Waiting until now to do this, helps ensure that I get the size right the first time. It would be real easy for things to be off if you precut based off what a 2x6 should measure. Once the center section had time to set, I released the clamps and attached the sandwich boards the exact same way as the center section.
One of the best tips I picked up from Jeremy's video (mentioned above) was when he mentioned being mindful of which direction you screw from when the joint involves end grain. His suggestion is to avoid screwing into the end grain, but instead screw out of the end grain. In my case, this meant the pre-drilled holes were placed on the center section, directing the screws out of the end grains and into the side of the sandwich boards. Clear as mud? Lol, watch his video.
Once all the glue had settled, I broke out the sander with some 80 grit, then 150 grit and finally some 220 grit pads. I cannot stress this enough... there was so much sanding. Turns out, 2x6 studs aren't produced with smoothness in mind, go figure. I progressed my way through the grits until I had a 'smooth enough' surface. Following the video, I then grabbed some random objects from around my house and started beating the very thing I just spent the last couple hours sanding to perfection! Needless to say, I had mixed emotions, lol, but I persisted. Finally wrapping it up with another light sanding to knock of any sharp edges created during distressing.
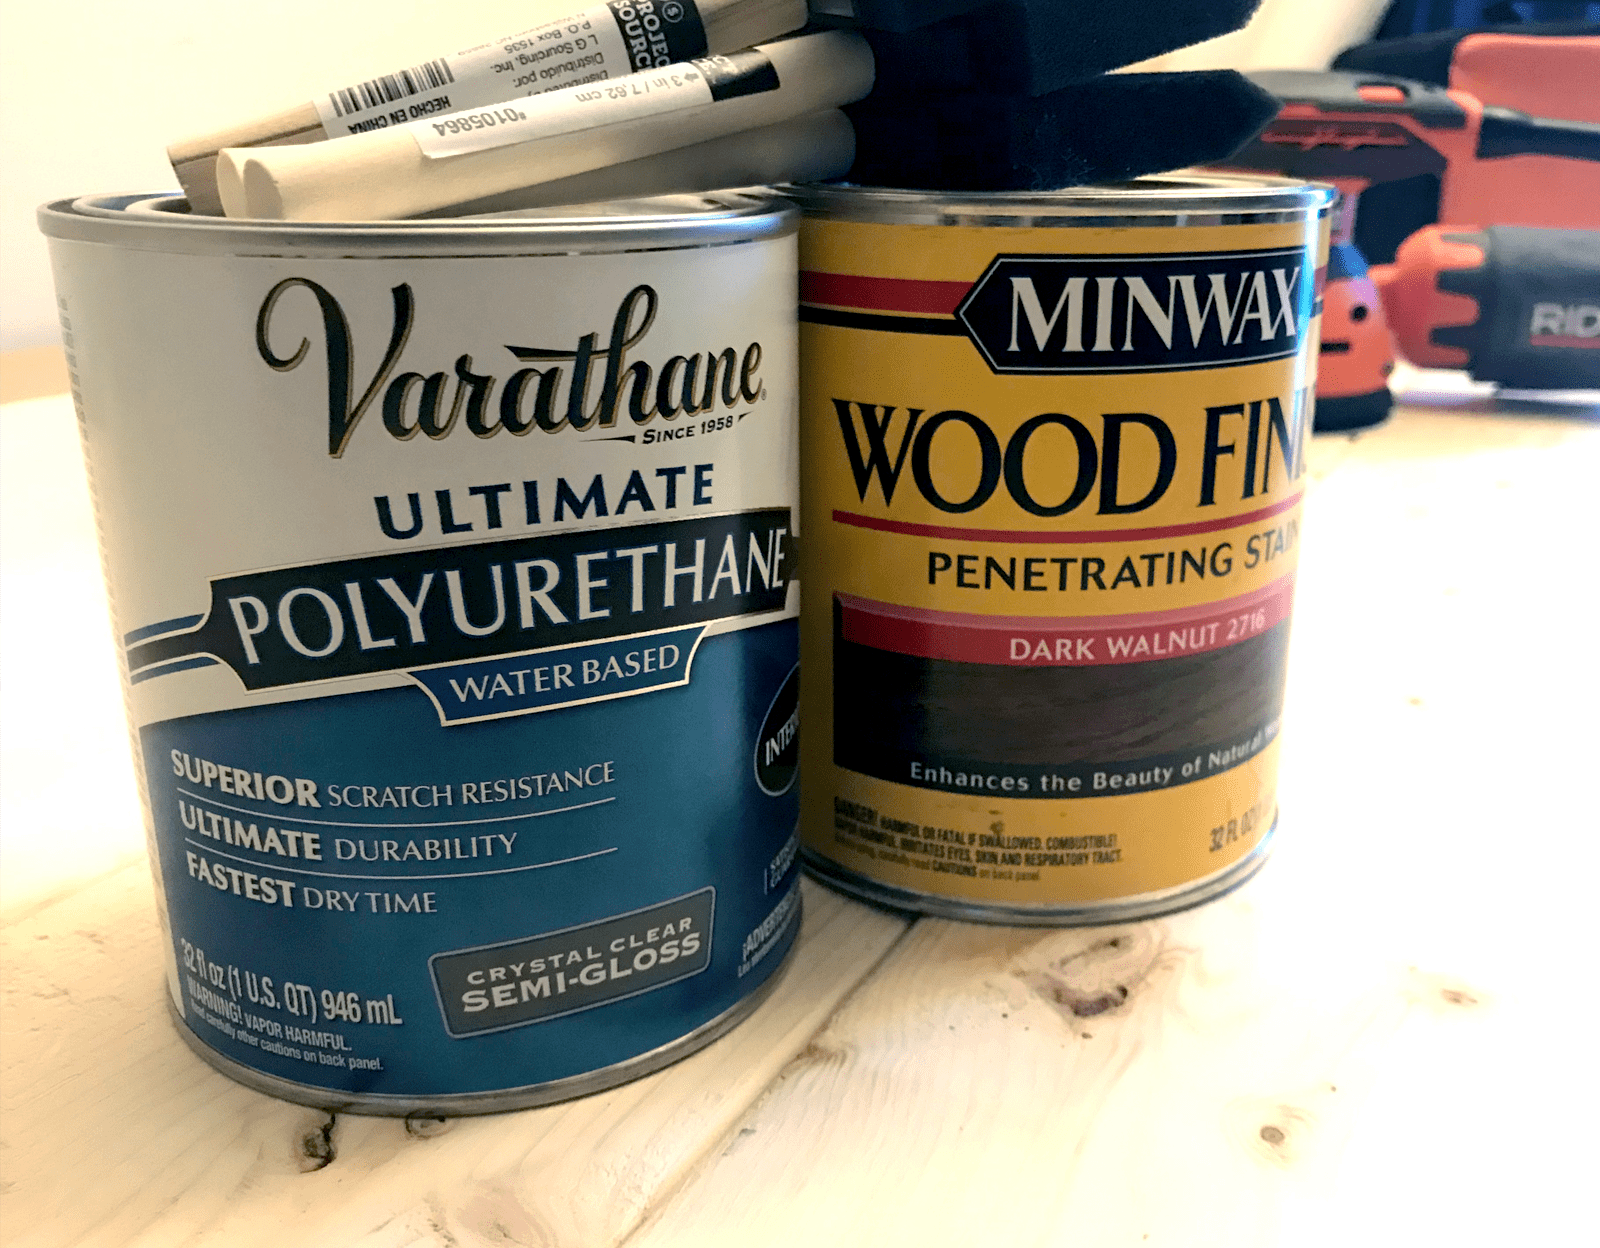
Staining always seems to 'get away from me'. Meaning I never get the results I expected. There's no doubt this is due to lack of experience, but... Did it stop me from trying it on my new masterpiece?... of course not! I picked up some Minwax Dark Walnut 2716 Stain, Varathane Semi-Gloss Polyurethane, some cheap foam brushes and a bag of terry cloth rags to get the job done.
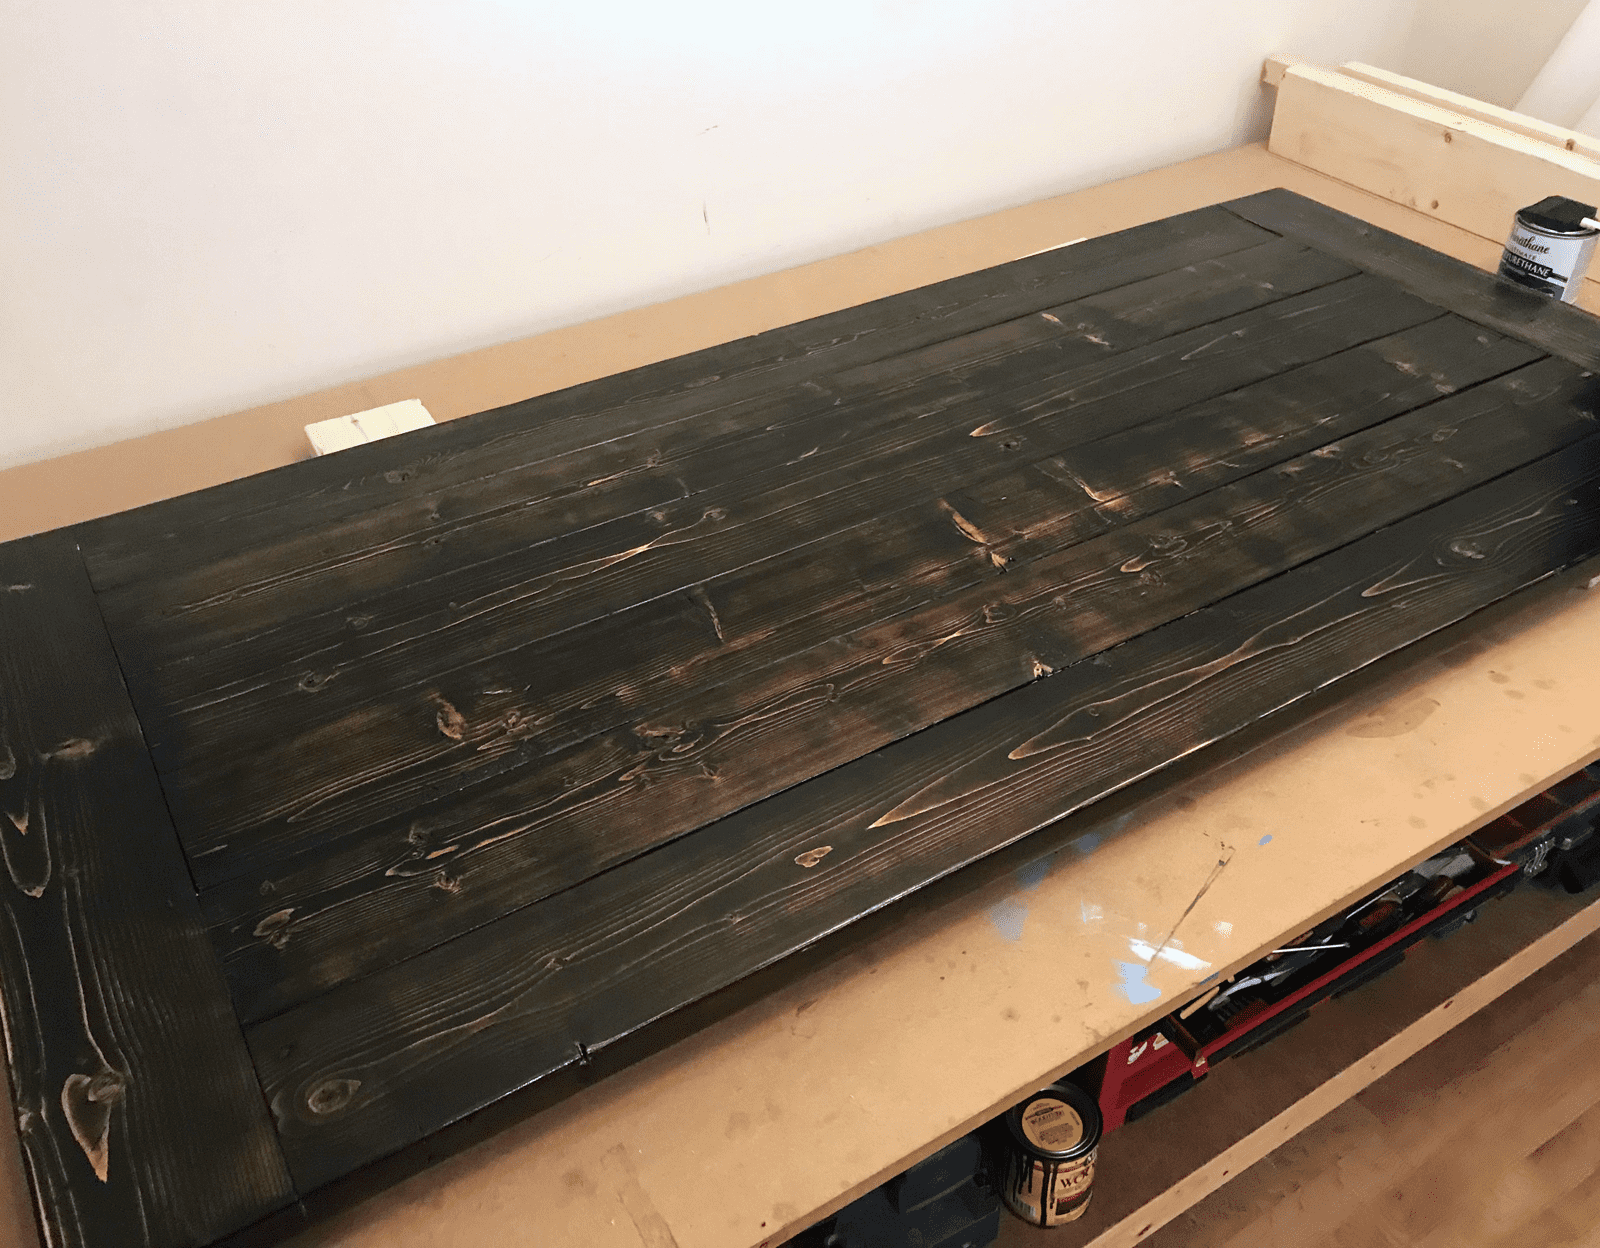
From the beginning, I had already messed up. I decided to stain this on a day with temps in the high 90s and a heat index further into the triple digits then anyone likes. Turns out, this makes the stain dry very fast. The can says, leave the stain on for 5-15 and wipe off. I thought, okay, I'll wait until 7 mins and I'll check it. The time passes, I walk outside and attempt to wipe it off and it was like rubbing off cold honey. Oh crap! I wiped off what I could, but for the most part, the desktop was black, not the dark walnut I had hoped for. I later learned there were ways I could have 're-liquified' the stain that was on there, but by that time, it was too late.
After wiping off as much as I could, I brought it inside (climate controlled) and let it cool off. I was able to wipe off a little more, but all in all, I didn't get much off. At this point, it sat, untouched for about a week while I decided what I wanted to do next. I was very close to scrapping it and starting over and if it wasn't for the time involved to get to this point, I probably would have. I ended up giving it a few passes with the sander, which lightened and highlighted the grain, as you can see below. I tried to sand in some 'wear spots' like Jeremy did in his video, but I kept them light.
To wrap up the top, I needed to add a layer of protection on that newly stained surface. This is where the Varathane Poly came in. I used a foam brush to apply 3 coats, being sure not to create any air bubbles in the can or when I brushed it on. That would have just created extra work and who wants that? This time around, I applied the top coat inside my house, where it was climate controlled. I was willing to deal with the smell (which wasn't bad) in order to save myself from dealing with the same issues I had with the stain and the heat. Plus, it helped keep it clear of airborne contaminates. After the final coat, I let it sit for several days before I touched it again.
Give me something to stand on, said the desktop
When it came to the base cabinets, I wasn't sure how I wanted to go. My first thought was to go with one of the Ikea Alex Drawer Cabinet and one of these Ikea Storage Cabinets. I thought Ikea stuff was cheap, but come to find out, it is not. At least when you don't have one locally. Shipping nearly doubled the cost and that didn't even take into account the door version of the cabinet could only be found on the Australia website. I can only imagine how much that shipping would have set me back. Once I made this realization, I decided to, again, build my own!
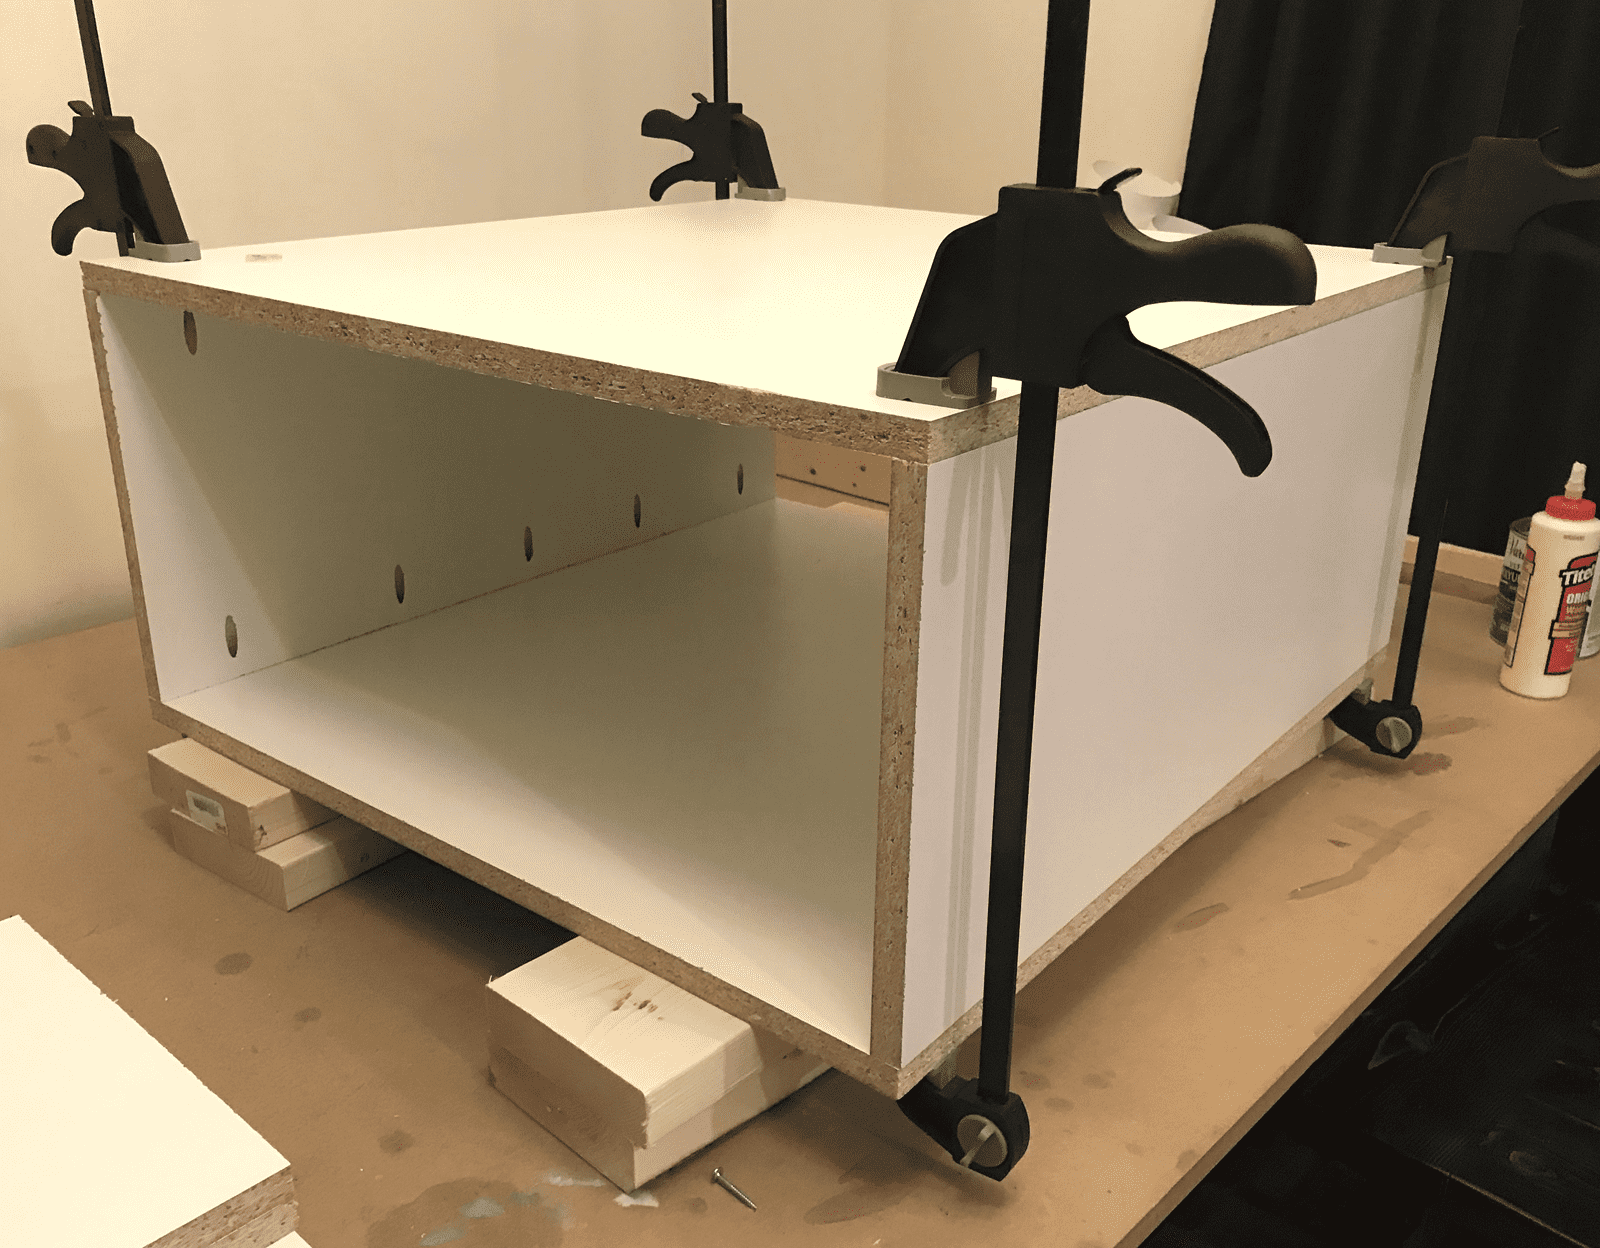
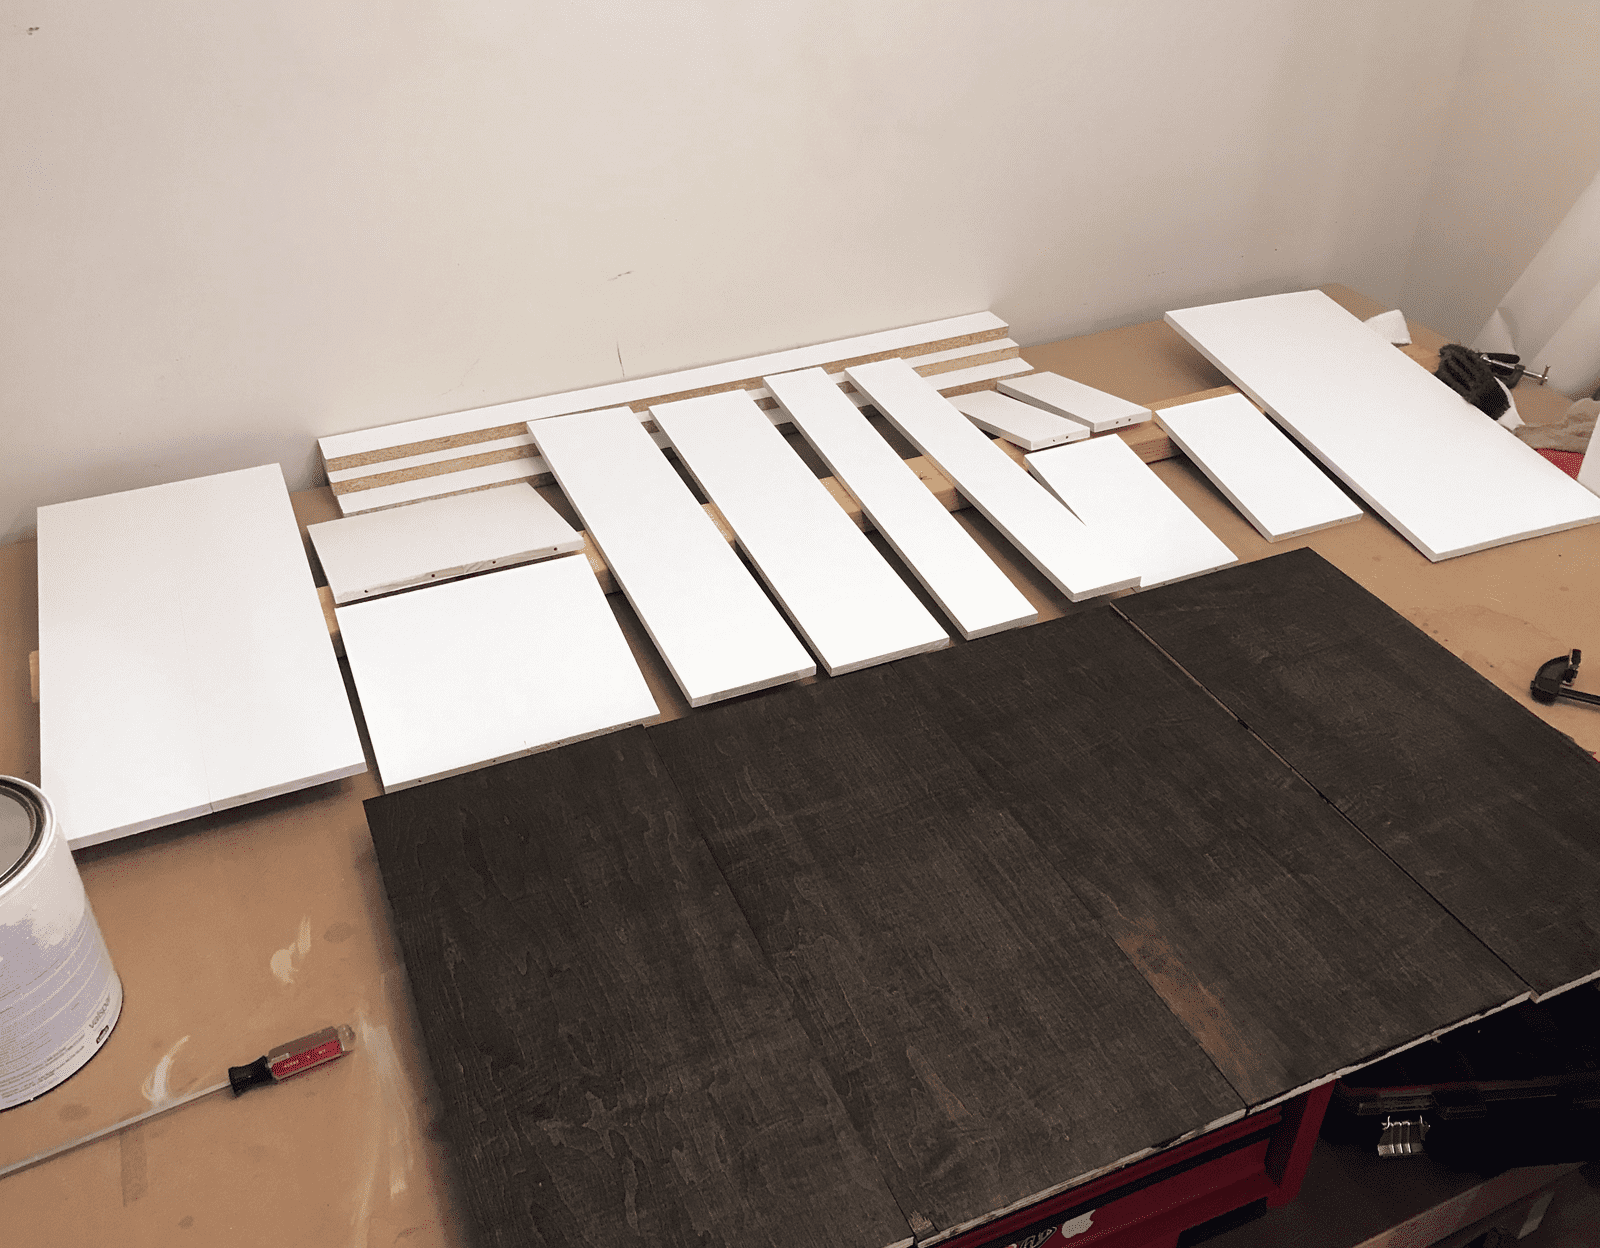
After some time in Illustrator furthering my plans, I bought a couple sheets of 4'x8' melamine plywood. This stuff is pretty cool. I also picked up some of the Band-It 3/4" White Melamine Veneer that was eventually ironed onto the exposed edges. Once I got home, I cut down the panels for the sides, tops, bottoms and shelf. Then I spent way too much time with the Kreg® Pocket Hole Jig. Drilling, I'm sure, way too many holes into the tops, bottoms and shelf. I used the same wood glue as before and some Kreg® Pocket Hole Screws (1.25", course thread) to assemble the cabinets.
Once the cabinets were assembled, I flipped them over and added adjustable height feet. This was important because I wasn't sure how much height I was going to need for the drawers to clear the carpet in my office (at the time). On top of the cabinets I added rubber pads to act as a 'gasket' between the cabinets and the top. The rubber also helps hold the top into place. In case the need arises, I do have predrilled holes in the top of each cabinet to allow me to attach them with hardware. It has been several months now and I haven't once moved the top or desk for that matter.
The trickier parts
So far, I haven't done anything that I haven't done before, at least to some degree. What comes next though is about to change that. I knew going into this, drawers were going to be a challenge. I hadn't ever attempted to build a drawer before, but I didn't feel it was out of my abilities. After a lot of thinking, I finally decided on the number, the height and the depth of the drawers. I went with oak appearance boards for the outer boxes and a birch plywood for the bases.
Since the bottom drawer was designed to be able to hold file folders, I had to use two 6" boards and attach them together with the trusty old pocket holes. Which is also how I assembled the outer boxes together and the outer boxes to the bases. Of course using wood glue, same as always.
I ended up with three drawers in what would become the left cabinet and a faceless drawer in what would become the right cabinet. The faceless drawer is actually a sliding tray in the right cabinet. Hopefully making it easier to access the back of any hardware stored in that cabinet.
When it came to finish, I decided to go with a semi-gloss white for the outer boxes and in an attempt to be fancy, I stained the bases to match the desk's top. Though not as dark as the top, they turned out nice and add a little extra touch. The face-boards were also painted semi-gloss white, but were made of MDF. This is something I had on hand and decided to save a bit of money and use it for the faces.
It's only been a few months since completing the build and I can already say, I regret it. Turns out MDF, is pretty soft and if you have a heavy drawer or a drawer that sticks (we'll get to that later), the screws used to mount the face, can pull out of the wood (done that). Luckily, I was able to repair the face that came off, but now the faces for all the drawers don't line up and I have to admit, it drives me crazy.
One of the tricker parts of the drawer build was figuring out how I was going to make them actually work. I first thought of adding some slide rails to the insides of the cabinets, but I have had bad experiences with drawers like that and I didn't want that to be an issue here. Also, at this point, I had invested a lot of time in this build, and I felt like going that route was cutting corners. So, I opted to buy four sets of the accuride drawer slides.
I decided to use these slides before I had built the box, so I had read some of the documentation online and felt confident I had it figured out. Turns out, I did not. I checked to see how thick the slides were and that's all. What I should have read was the actual gap they recommend for installing. Which, I had wrong by 1/16". When I first realized this, I thought, it's a 1/16 of an inch, it'll work and it does in fact work, but not as intended.
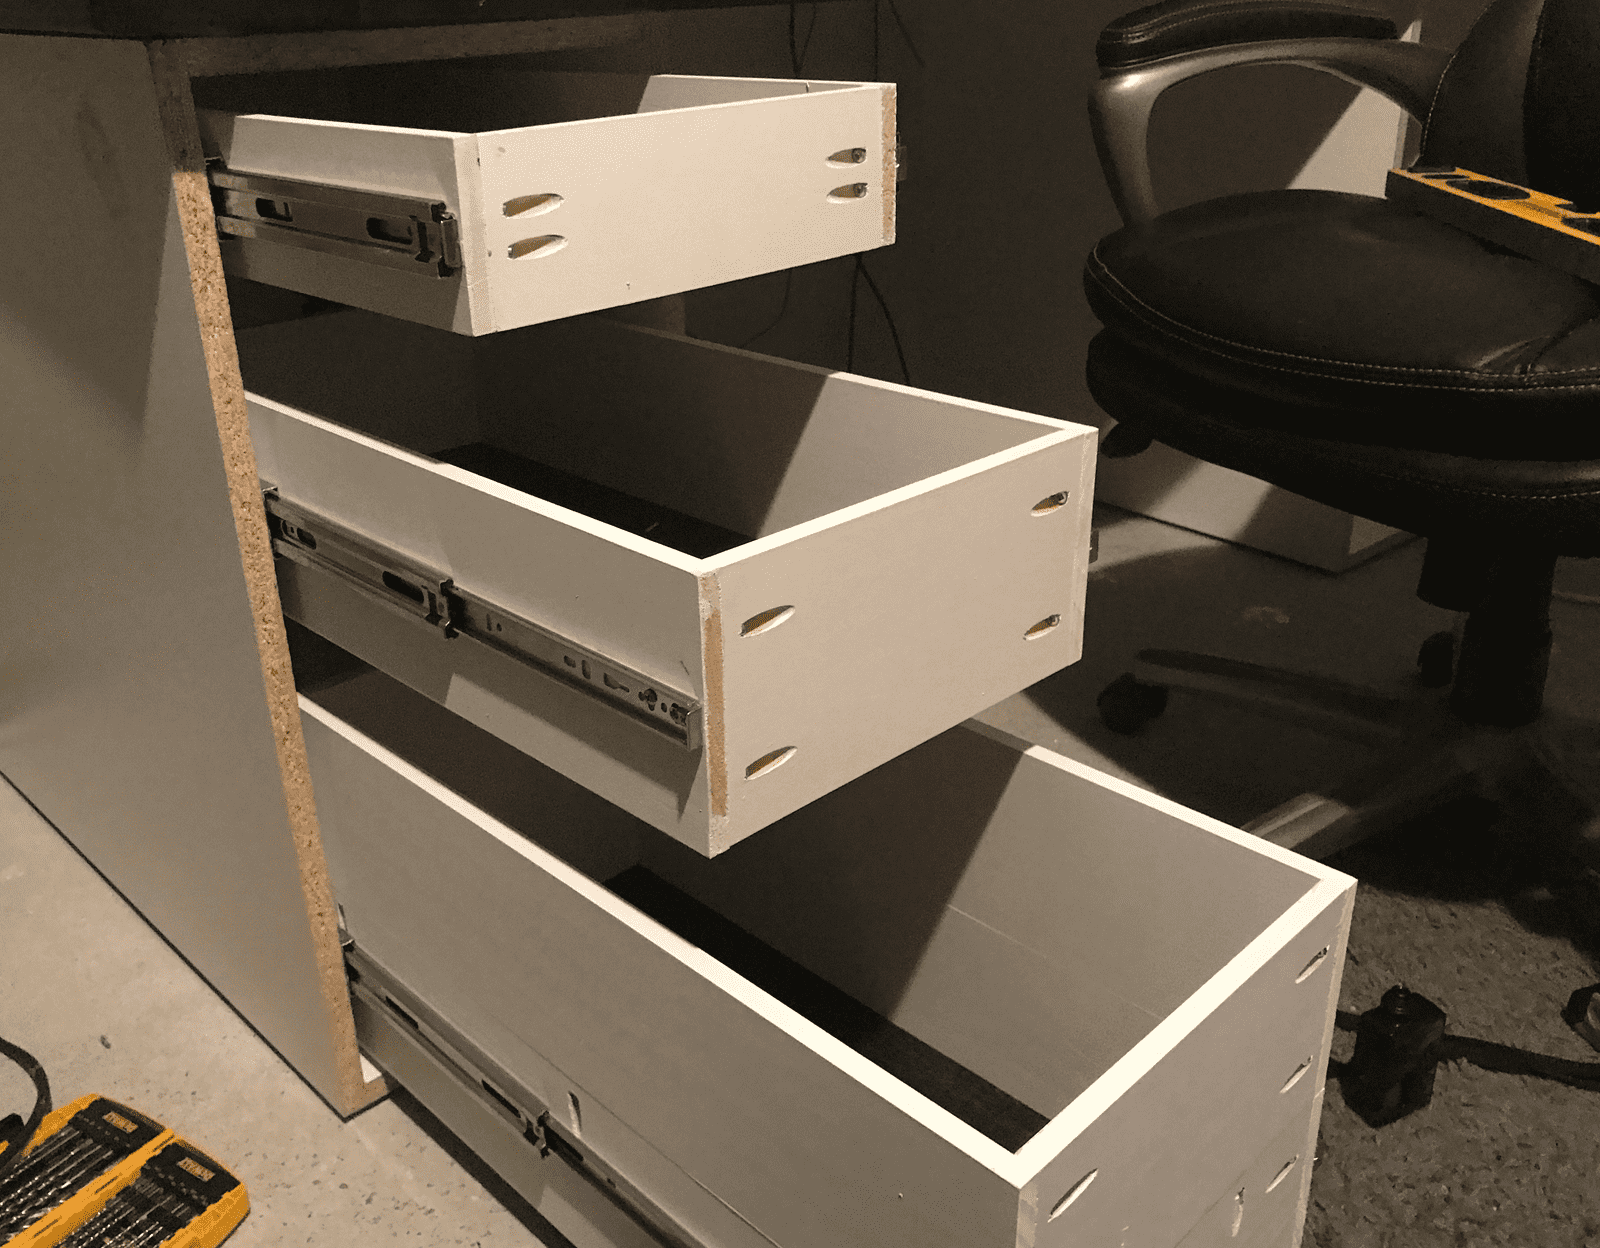
In order to install the drawers into the cabinets (by the slides), I have to force them in. I've gotten pretty good at it, and I'm sure I've scrapped off enough wood and paint at this point, that I've given myself a bit of a tolerance. One of the first times I installed them, I ended up popping off a part of the slide and broke it. The self close mechanism on these slides are plastic and at the far back end of the slide. When I crammed the drawer in, it caught on the plastic and snapped it out. Fortunately, I didn't have to replace the slide. I was able to put it back into place and it still works, even though it is broken.
Now, I'll be the first to admit, I'm not a master carpenter...
Okay. It's confession time. This is where I am supposed to tell you about the installation of the door, but in order to do that, it would need to be completed. This isn't due to lack of effort, well there was one attempt but sadly it was a failure. I decided to make a jig to help locate the spots for the pocket holes required for the hinges. To do this, I cut down a scrap piece of wood, made some measurements and drilled some holes. It was really fast to write that, but it took forever to get it done. After the 1/16" ordeal on the drawers, I was being overly precise in making the jig.
After getting the holes drilled, I went to mark the locations in the cabinets and realized I had made a couple mistakes, both involving the shelf. The jig I made wont fit where it needs to fit, because of the shelf. The other problem is the location I painstakingly measured out and drilled on the jig would cause the shelf to block one of the mounting points.
At the time this happened. I was in the process of remodeling my house and putting it up for sale. This pulled all my extra time away from the desk and sadly, it still sits not attached. So, for now, I just lean the door against the cabinet, if I want it to be closed. Once I get into a position to do some woodworking again, the door is my first project. When I complete the install, I will update this section.
Update: After writing the above, I did go back and try again, but turns out, it just was not meant to be. I was able to get the hinges mounted and the door attached. It opens and closes as planned. What was not planned, with the door attached, the drawer/tray for the PC cannot slide out. Not the worst thing ever, but makes the tray pointless.
Find a place to put your feet up
At this point in the story, I have a desktop and two cabinets. One cabinet houses three drawers and one a shelf and it is missing a door. If you ask me, that does make a desk... Or does it? My old desk had a feature that you wont find standard with many desks; a foot stool! My old foot stool was two scrap pieces of 2x4 with a scrap of 1x8 on top. Needless to say, it wasn't anything to look at. This time around, I wanted it to match the desk. So, I made a mini desk. Unfortunately, I didn't take many photos of that process, but I do have this shot that compares the old one with the new one. You might notice, this was taken before adding the veneer banding to the edges.
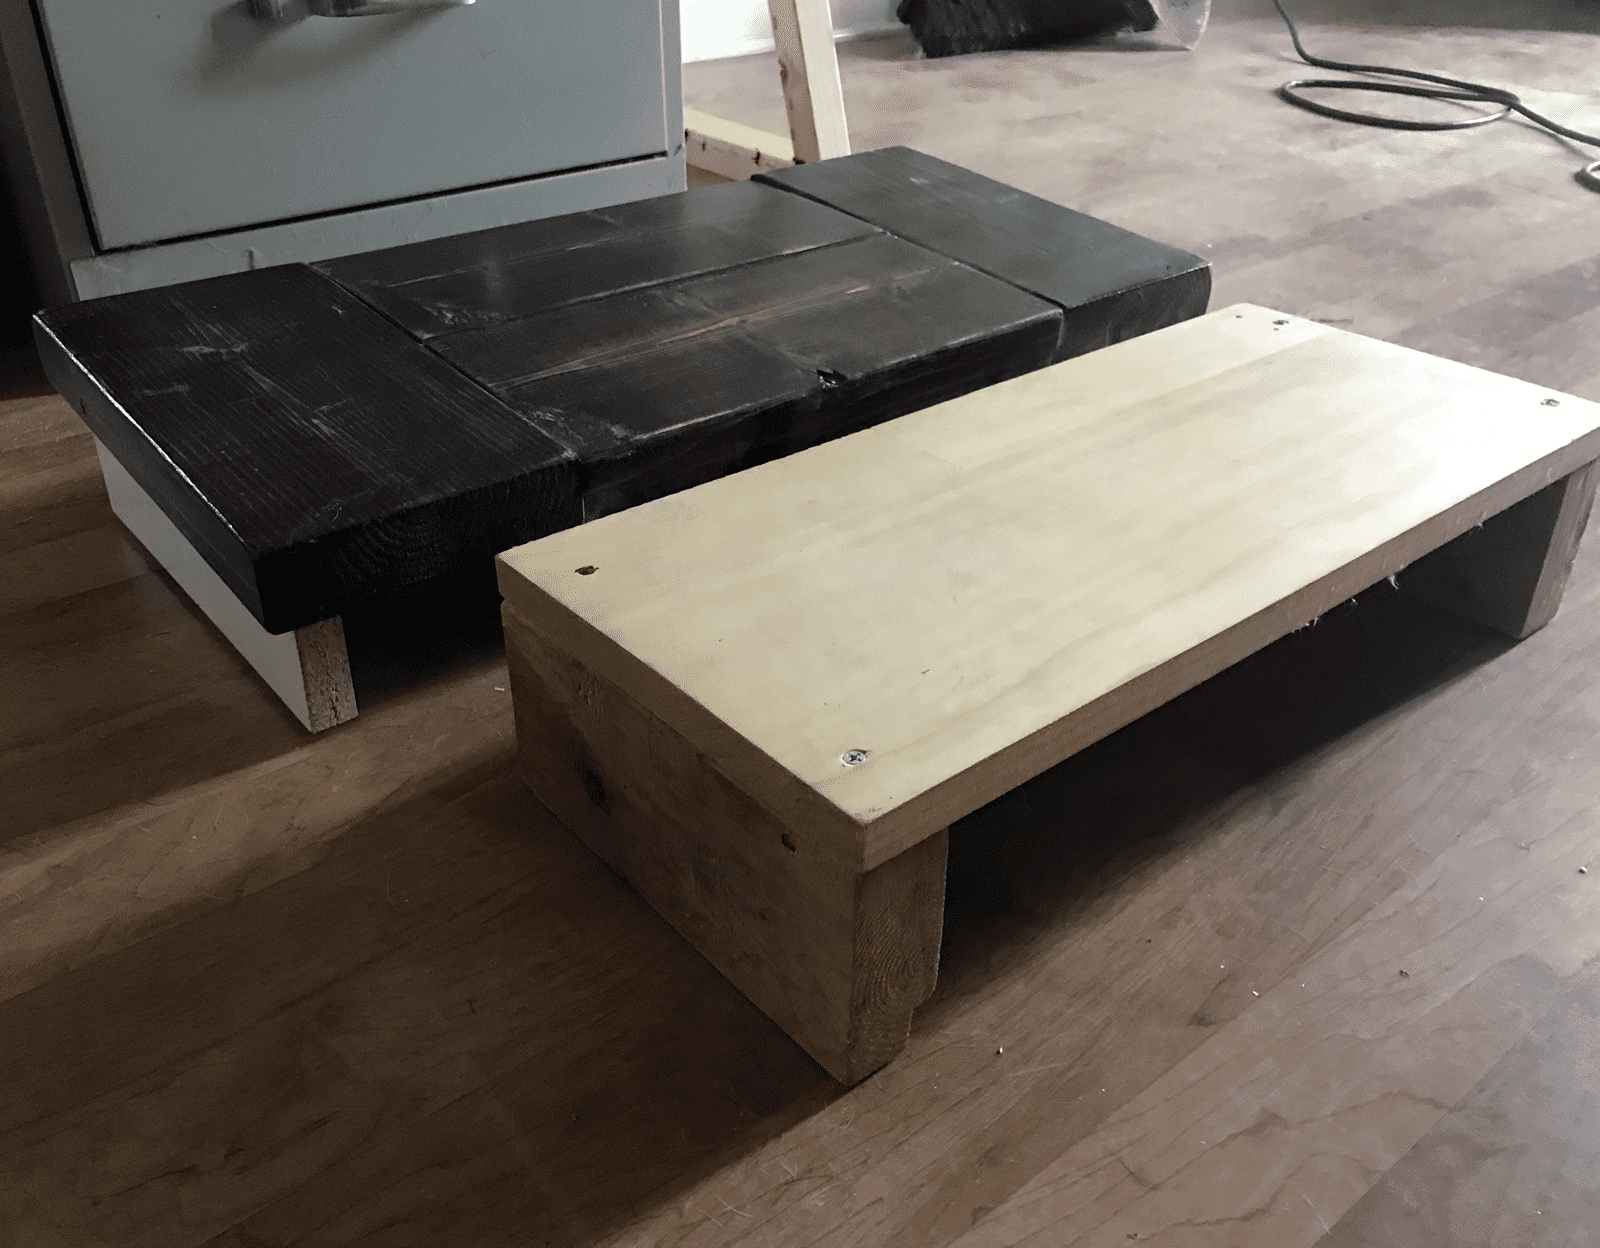
Using scraps from the desk's top and cabinets, I assembled four pieces of the 2x6 boards together, just as I did with the top. I also gave it the same stain and polyurethane coatings that I gave the top and drawer bases and attached them with Kreg pocket hole screws. While the top dried, I cut two pieces of the melamine down to act as legs for the top and attached some 1/2" rubber feet to the bottoms. After the top had time to cure, I ironed on some of the melamine banding and attached the feet to the top with more pocket hole screws. I'm not sure what your thoughts are on a foot stool, but I absolutely love mine. I couldn't imagine this desk with out it.
Assembling the final product
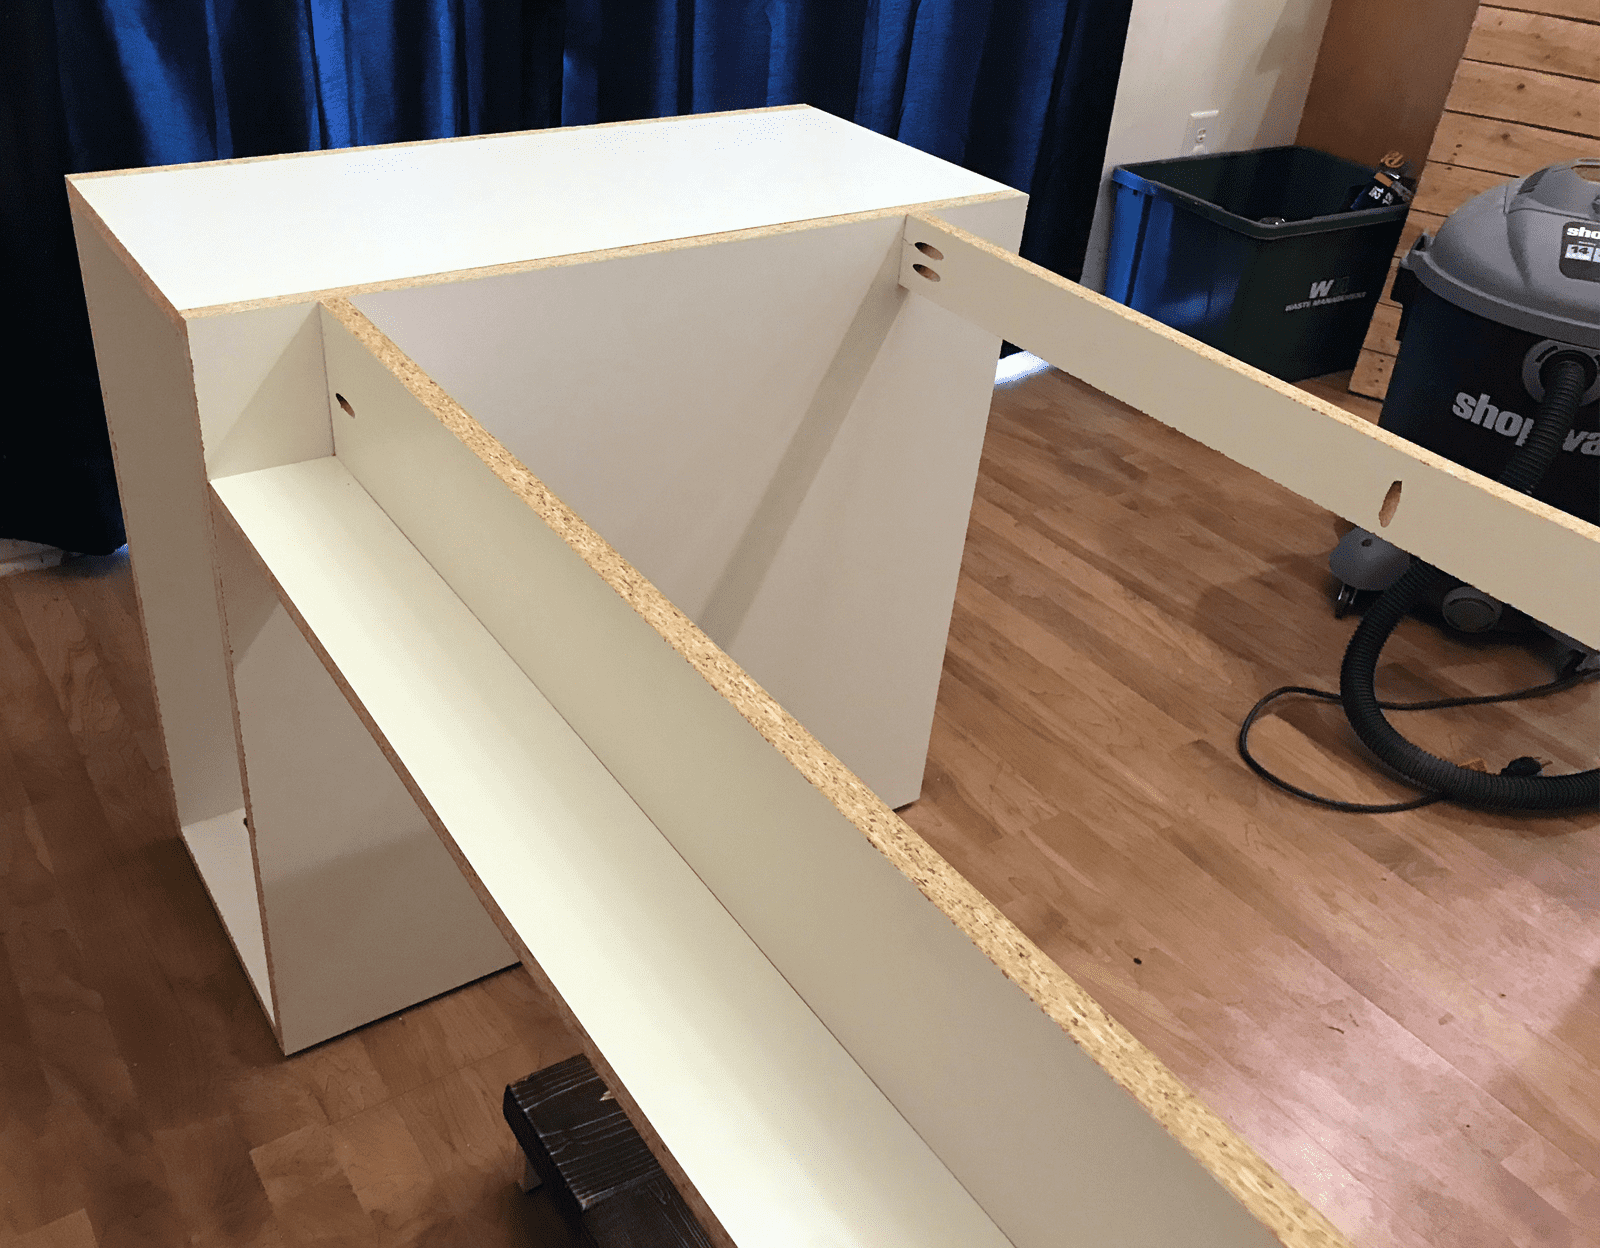
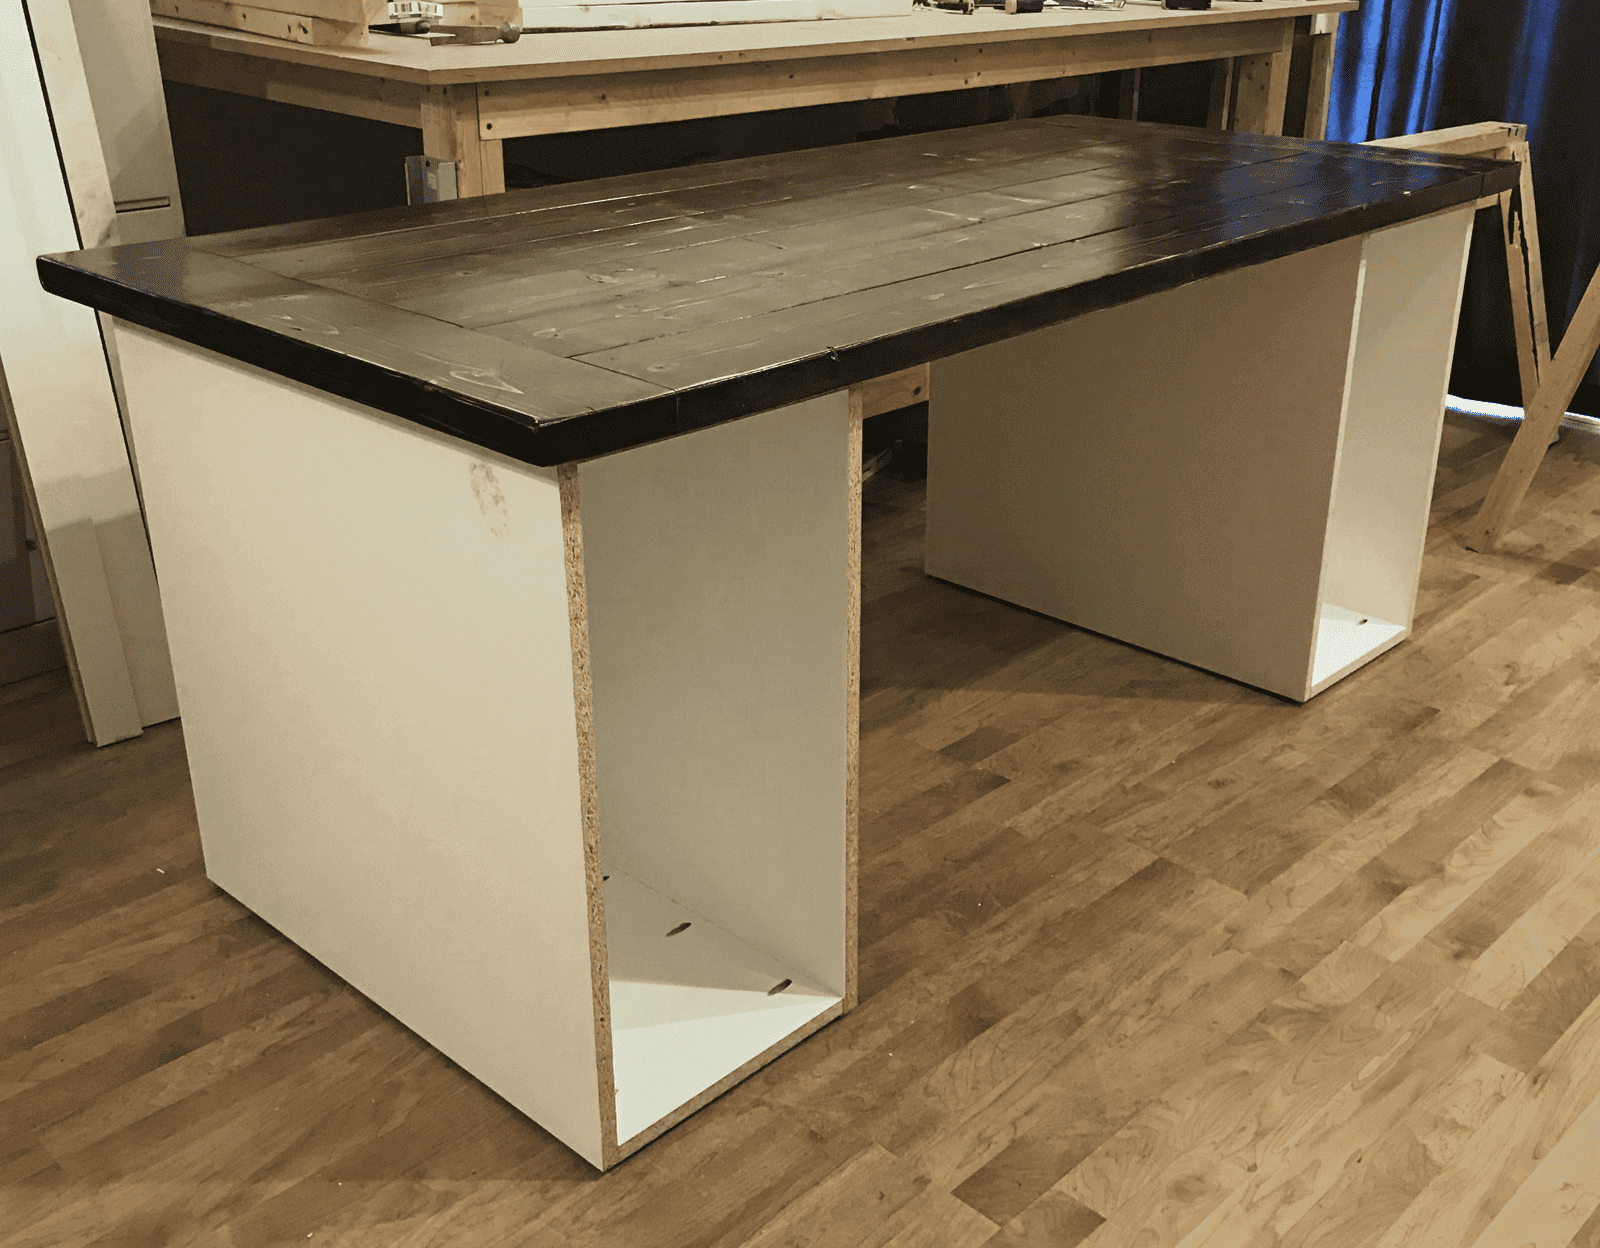
The final step required for me to call the desk 'complete' was to add some straight bar handles and put everything together. As I mentioned the top just uses gravity to sit on the cabinets. The cabinets themselves are attached by two support beams that run under the desk top. One in the front and one in the back. The one in the back has another piece attached to it, creating a shelf for cable management. Some hook and loop cable ties and strips help keep everything in place and tucked away. After this shot was taken, I added a wire port on the right cabinet, next to the wire shelf in order to run cables through to the equipment contained inside.
With the drawers inserted and the door attached, I could finally sit at my desk. To say I was smiling would be an understatement. This project got way out of hand and ended up taking way more time to complete then I originally thought. Damn scope creep! In the end though, that smile, was all that mattered because I was happy with what I had produced.

Old versus new
The old desk measured out to be 68" x 24". The top a frame made from 2x2s with a thin 1/4" piece of plywood on top. The top layer of the plywood must have been exposed to moisture, because it was anything but smooth. Pieces of it were cracking and some places had missing pieces. The worst part was using a keyboard and mouse on this surface. The keyboard would rock if not positioned correctly and I had to use a owners manual under my mouse pad to ensure I had a flat even surface for the mouse. It sucked!
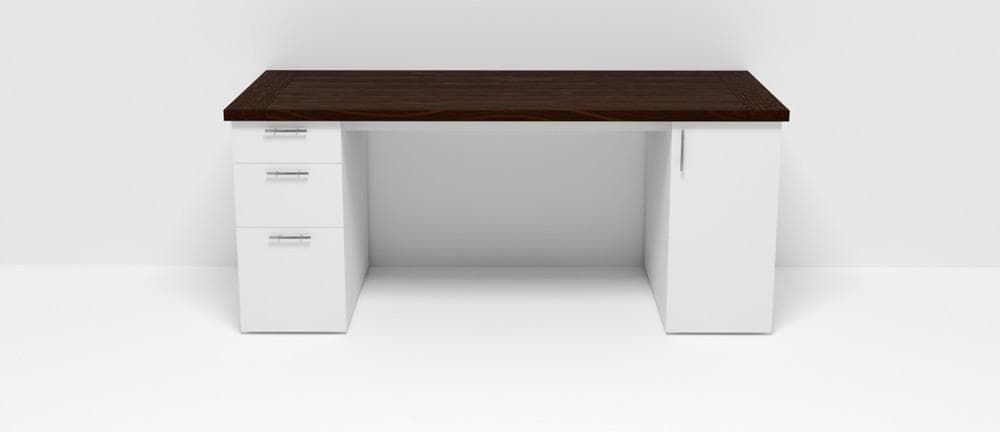
My new desk measures 72" x 33", the top is made of one and a half inch thick solid wood and has loads of storage space. To compare the old desk with the new would be like comparing a Ford Model T with a Tesla Model 3. Without question, the new desk is a welcome addition to my home office. No longer am I worried that my equipment may come crashing down, nor am I struggling for storage space. I have to say, it's pretty nice.
Many year review
I have been using this desk for several years now and I do love it, however, I have to say it is far from perfect. There are so many things that were a fail with this desk and I have plans for a replacement build, but life is preventing that from happening for now. The new build will address all the issues I have had with this one. In addition, I plan to eliminate the doored cabinet and instead use two identical 3-drawer cabinets. What seems obvious now, turns out a gaming pc in a closed or confined space is not a good idea.
If you have read everything to this point, I'm impressed and I do apologize, I can be long winded when I type. I post articles from time to time about random geeky things, stop by and have a read every once in a while. I enjoy the company.
Thanks for reading.