
Too Long; Didn't Read
- PCB: DZ60 v3 with USB-C
- Plate: SS DZ60 Plate, Chemically Stained Black
- Stabilizers: GMK Screw-ins, Clipped + Lubed
- Switches: Gateron Silent Browns
- Case: 60% Dark Walnut Wood Case
- Keycaps: Black DSA PBT Blanks
- Configuration: ISO with Arrows
Let Me Introduce My... Keyboard Project
Do you have any experience in board level electronics and components? No. Have you ever built something from a circuit board? No. Have you ever soldered anything before? No. Have you ever owned a mechanical keyboard? No. Do you have some time to kill and some money to waste? Hell Yeah! Tag along with me as I build my very own, custom mechanical keyboard. What could go wrong?
It may be funny, but it's not a joke. I am doing it. I feel confident enough to handle some basic soldering and everything else is basically buying things that balance between what you like and what will work with what or how you want your build to be or look. So, first lesson, prepare to make compromises.
Below is the-what and the-why for each part of my new keyboard. I tried to take pictures of each item and detailed any issues I had that may help someone in the future doing something similar. When I can, I'll also include links to where I got them.
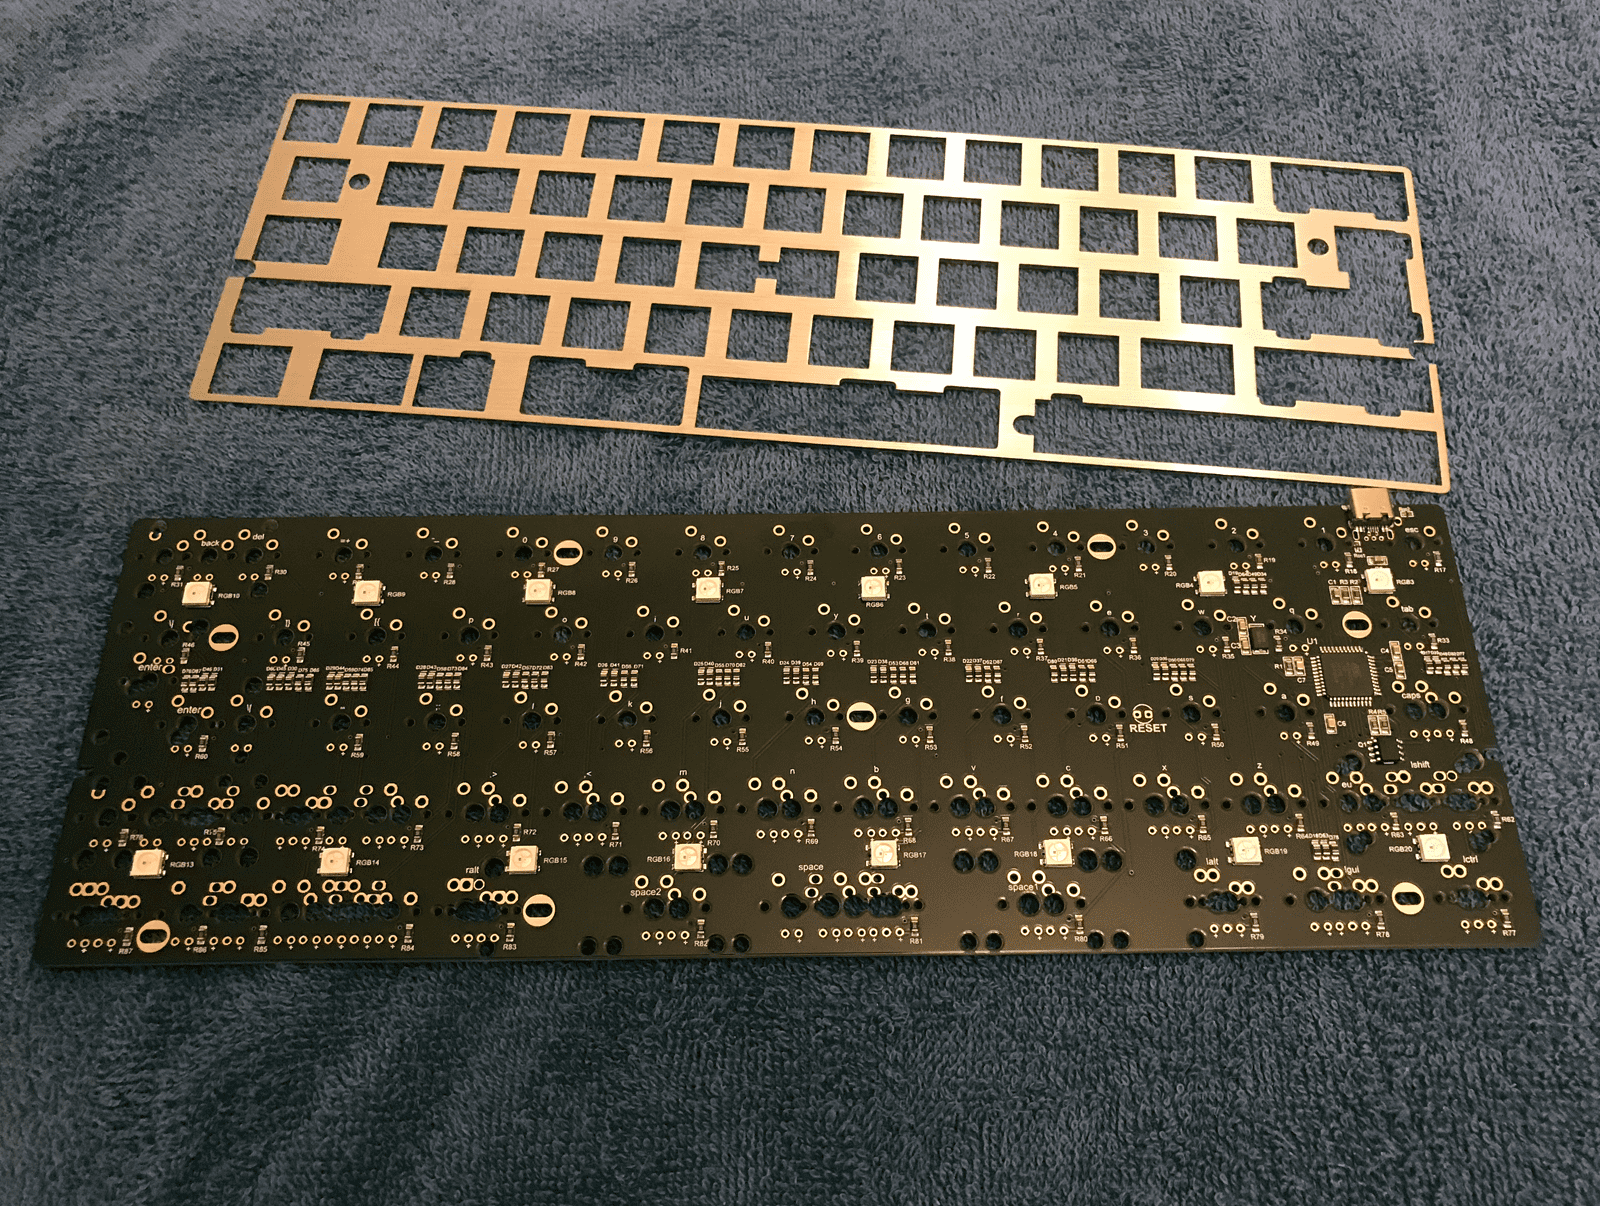
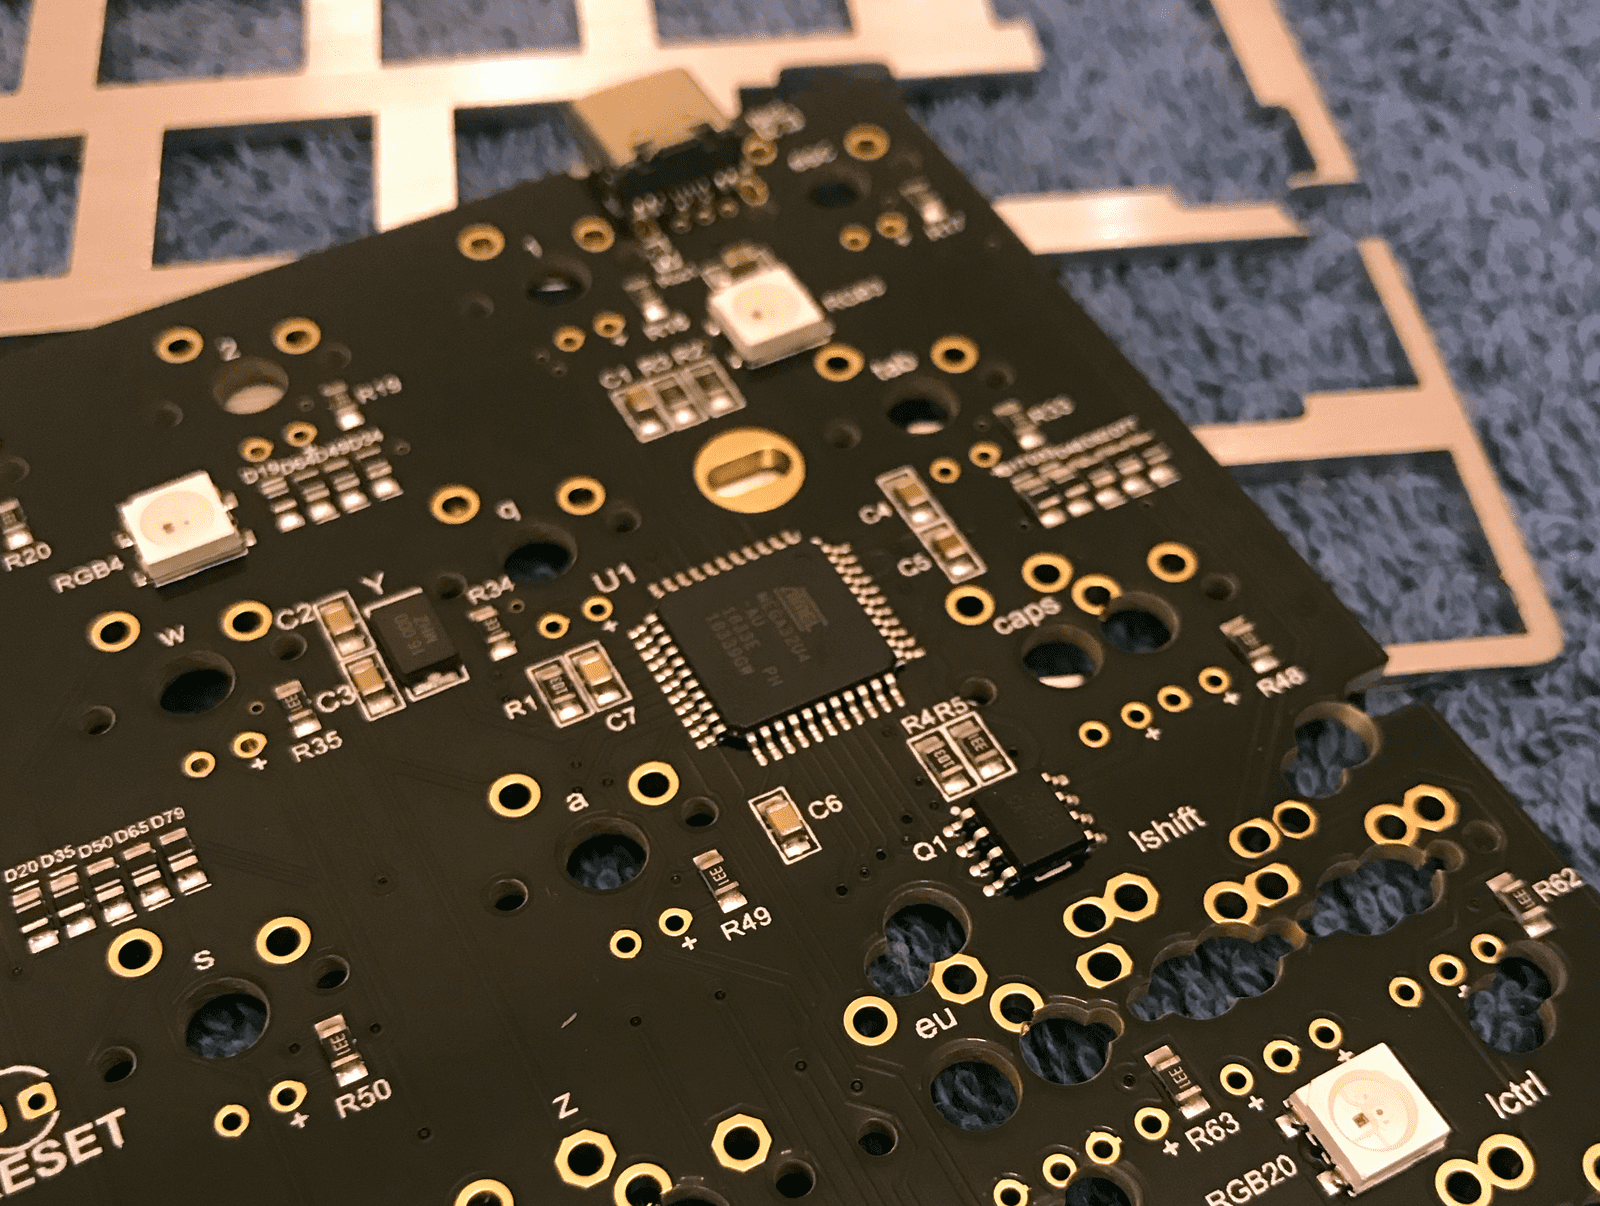
DZ60 v3 Black PCB with USB-C (to C) and RGB Under-glow
When deciding what PCB I wanted, the first thing I had to do was decide what key layout I wanted. That is what makes a lot of the decisions about what you have available and ultimately what you end up buying. In my case, I knew I wanted a '60%' board, but I had to have dedicated arrow keys. I first started looking at the 65-67% boards; like the KBDfans Tofu65. Each had things I wasn't a fan of. A big one was not having a usb-c connection. Seeing as that's the only port my work computer has, I felt it was a must. And yes, I just wanted something that was usb-c, finally.
Eventually, I had seen a few different builds that had turned a typical 60% board into one that had dedicated arrows by altering the right shift area and the right side of the bottom row. Once I decided I wasn't going to find a board available in the tofu65 configuration with every feature I wanted, I decided to go for the DZ60 v3 from kbdfans.
To complicate things a bit more, I also want to do an ISO return key instead of the typical ANSI layout. However, its not an ISO layout either, as I am keeping the left side in the ANSI configuration (standard shift). I certainly complicated things with this layout and I'll get into it more later.
I ordered the board from Amazon. I was originally going to order it directly through KBDFans website, but the only payment option is Pay Pal, which believe it or not, I don't have an account with. I then remembered they have an amazon store. Which is where I picked up the PCB and the plate (details below). Their selection on Amazon is limited, and seems to be hit or miss when it comes to finding something on there you need or want.
If you decide to go with Amazon, be aware that when I ordered mine, the shipping ended up being $25. Which seemed crazy at first, especially since on their site, the most expensive shipping option was $20. However, in the end, it was actually cheaper in total because the parts were actually cheaper on amazon. Basically, I got upgraded shipping for free because the total was close to what it would have cost for the parts and the mid level shipping option. Pretty cool I thought. Plus I could pay any way I wanted, including an amazon gift card I had on my account. Sweet!
Since I ordered it through Amazon and not directly through KBDFans, I was worried the board wasn't the version 3 model. However, when it arrived and I opened the plastic to see that beautiful black PCB staring back at me. I was so excited! Perhaps, too excited, lol. It looked amazing and I couldn't wait to start building it. Unfortunately, I still had several items to get before I could start the fun part.
While patiently, or not so patiently, waiting for all the items to come in, I plugged it up and ran through a key test on one of the few keyboard testing sites out there. Much to my joy, it passed with flying colors... all while glowing red from the under-glow LEDs. Happy times!
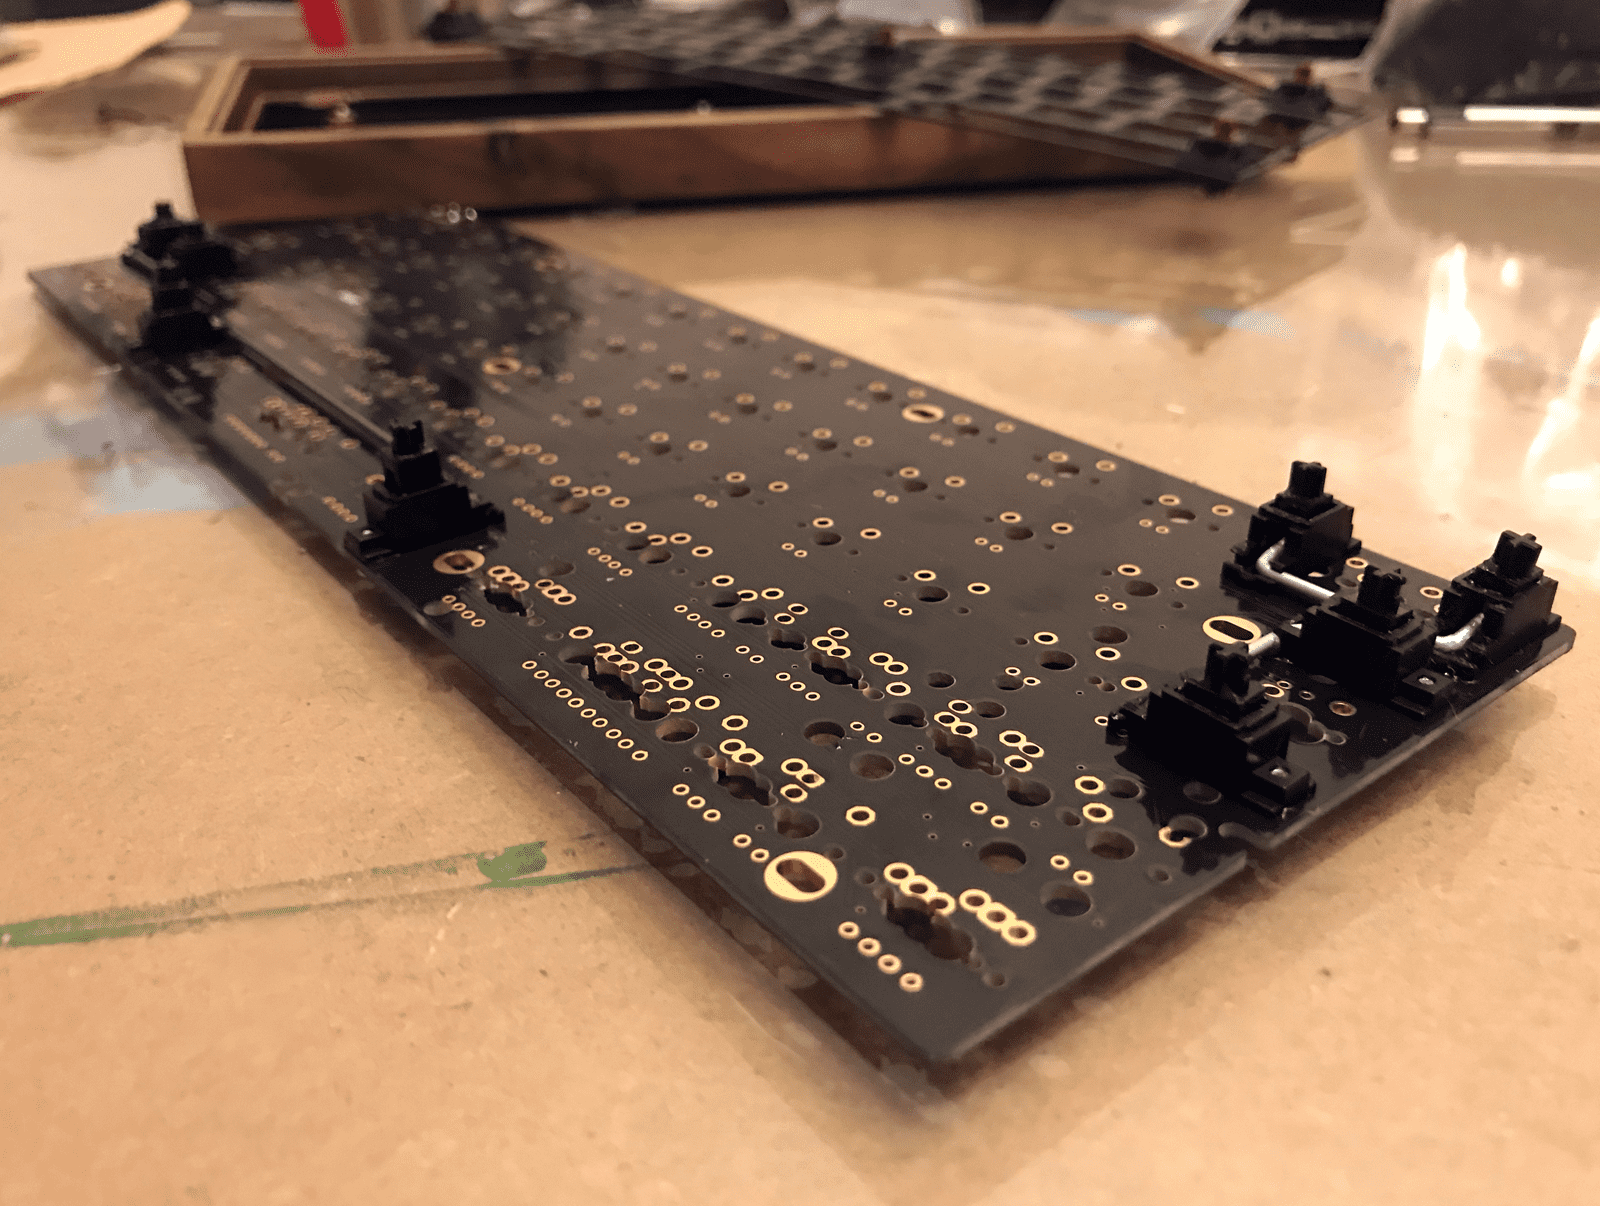
Stainless Steel 60% Plate for the DZ60
This one tripped me up. Basically because I didn't know what I needed or wanted or really anything about plates. Plates? WTF is a plate? I mean I've read about the benefits of having one and not having one. But do I need an aluminum, steel, brass, carbon fiber? What's the difference? Honestly, I'm still not sure I know now, but I did decide on one.
I did conclude that some plate materials provide different feedback when typing. Springy or more solid. This led me to decide on getting the heaviest one I could find. Which was the brass. Sweet! Wait, over double the cost... remove from cart. Yep, I got the b-plate in stainless steel. I also chose this one because I knew it would allow for my dedicated arrow configuration and I wasn't 100% sure the brass version would have worked.
The PCB and the plate were ordered from KBDfans, as I mentioned above. They arrived super fast, in my opinion. Considering how far they had to travel, I braced myself for a couple weeks. I placed the order around 10 or 11 on a Saturday night, and Sunday received a notice my order had been processed for shipping. Sweet! Still, I was prepared. The amazon estimate said 4 days to 14 days, so I was ready. I come home from work Thursday and there it was... My order, all the way from China, sitting in my mailbox... in only 4 working days!
The plate is a lot more substantial then I thought. I would consider it a high quality piece of metal. As for functionality it seems to be great. I have seen on some YouTube build streams, other plates have a tighter fit for the switches, but even though mine wasn't super tight, it was still snug and I didn't run into any issues in that regard. I did, however, have to hold the ISO enter key and the key next to it because they didn't actually snap into the plate, but rather sat directly on the PCB. I had already trimmed the switches PCB mount pins, but it still worked without them.
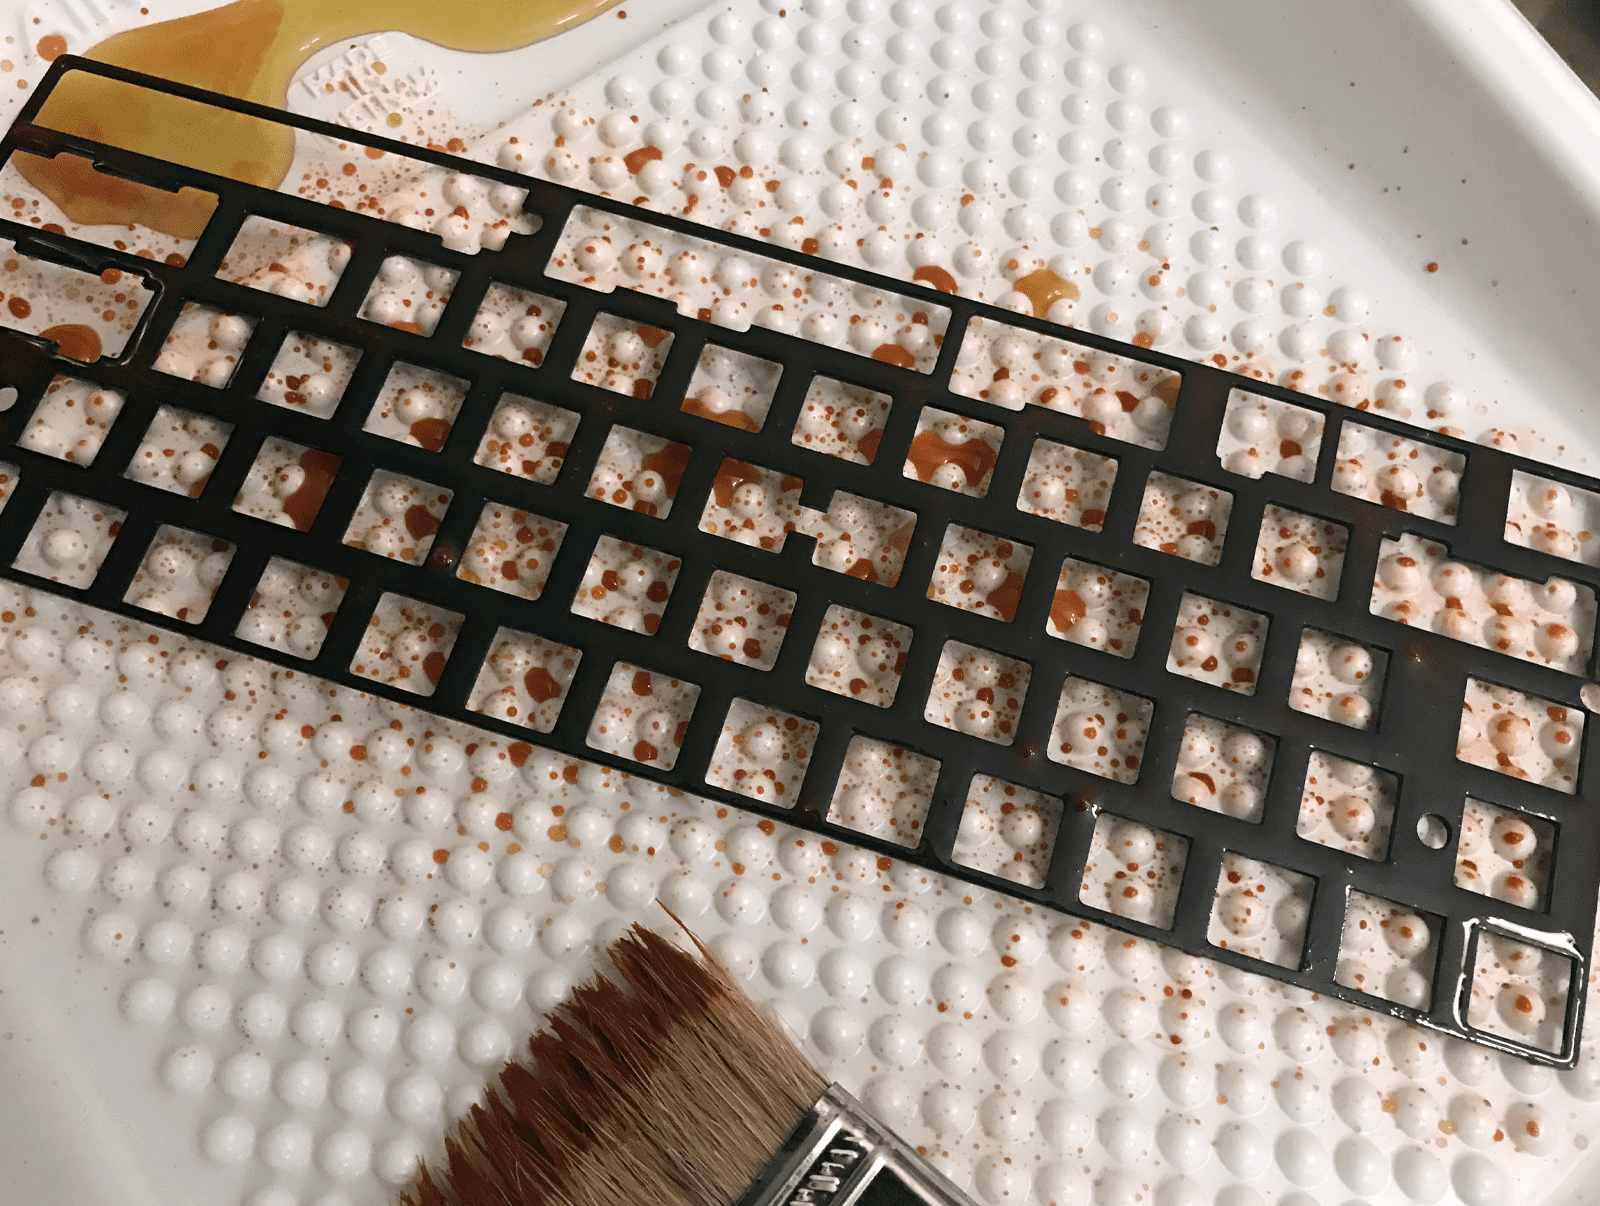
The one thing I wasn't thrilled about was the color. I get it, stainless steel is shiny, but I wanted black and I know there is a such thing as black stainless steel. Go to the major appliances section, any where that has one and its everywhere, fake or not. I found a solution that will blacken stainless steel, without needing a heat source and without costing a fortune because you have to buy enough to do a ship. It's called Sur Fin Chemicals NI Black 40 and I found a video of someone turning a stainless steel sheet black with it. Seems simple enough.
The process was very simple. Sand the metal down (I used 100 grit general purpose), clean it with 91% rubbing alcohol, brush on the chemical, let it sit a few mins, tap the brush across the surface of the metal and rinse thoroughly with water. The process took maybe 5 or 10 mins. As soon as I touched the chemical to the metal, it instantly turned black. Once I rinsed it off with the water, I dried it off and then sat it to the side to allow it to completely dry.
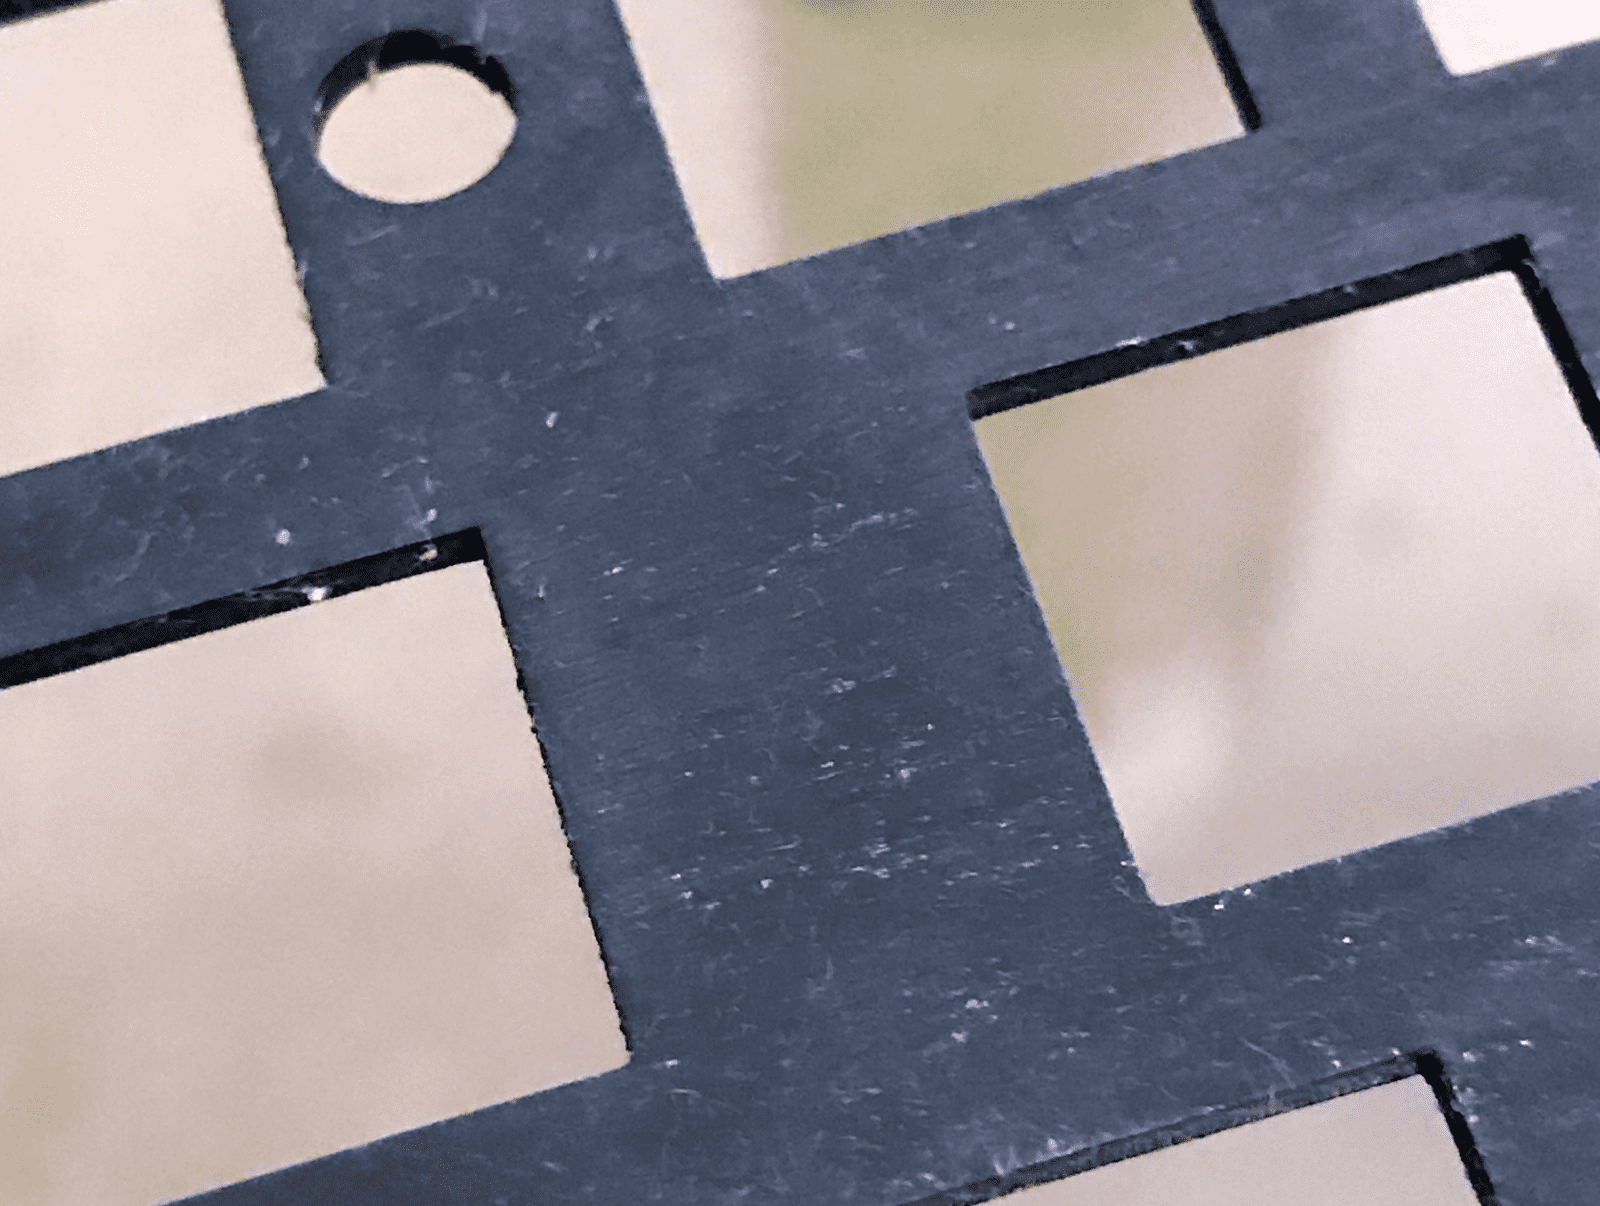
The result was a flat black metal. It wasn't perfect, but I blame myself for that. One of the corners wasn't as dark as the others and some of the switch hole edges in the middle of the board were a bit light as well. I think this was either because of the sanding or when I coated it with the chemical. I'd guess the sanding first, but just a guess.
GMK Cherry Screw-in Stabilizers
There wasn't a whole lot of thought put into the stabilizers. I decided to go with GMK's authentic screw-in cherry stabilizers. Since I was going for the a 'solid' board, I opted for the screw-ins. Do they make it more secure? Who knows, but in my mind, it does so those are the ones I went for. I purchased mine from NovelKeys. I included them in the order for my switches, which I also ordered from Novel Keys.
I ended up needing 3 2u and 1 6.25u. I disassembled them, clipped the legs and lubed them with the Super Lube (details below). I reassembled them and mounted them to the PCB. After I got them all in, I tested them with my fingers and noticed the spacebar wasn't coming up. So I removed it and discovered that when I reassembled it, I put on of the inner pieces in backwards, causing it to not be unable to raise up. Flipped it around and all was great with the world.
Super Lube Stabilizer Lube
Surprisingly, this was one of the pain in the butt items I had to order. I realize I didn't need much of it and when you find it on amazon, its in a 3oz tube, which will last for decades (shelf life aside). I did see several places that offer small 1ml or so tubes of it, but no one had it in stock. So I caved and ordered it from amazon.
To compound the insult, it was considered an add-on item on Amazon. Which meant my cart had to met a certain total before I could actually check out with it. I had other things to get, so it wasn't that big of a deal or so I thought... My total was $1.45 short. WTF? So to save a couple dollars, I spent $20 on something else (that I wanted) that I didn't need to buy right now. Good for amazon, bad for my wallet.
When it came to lubing the stabs, it wasn't complicated at all. Not that I expected it to be. The most difficult thing was making sure I knew how to put them back together. I found a video online that explained the entire process (tear down to rebuild). Basically, the one hole side goes to the back of the stab. The back of the stab doesn't have the bar. Hopefully, that's clear enough.
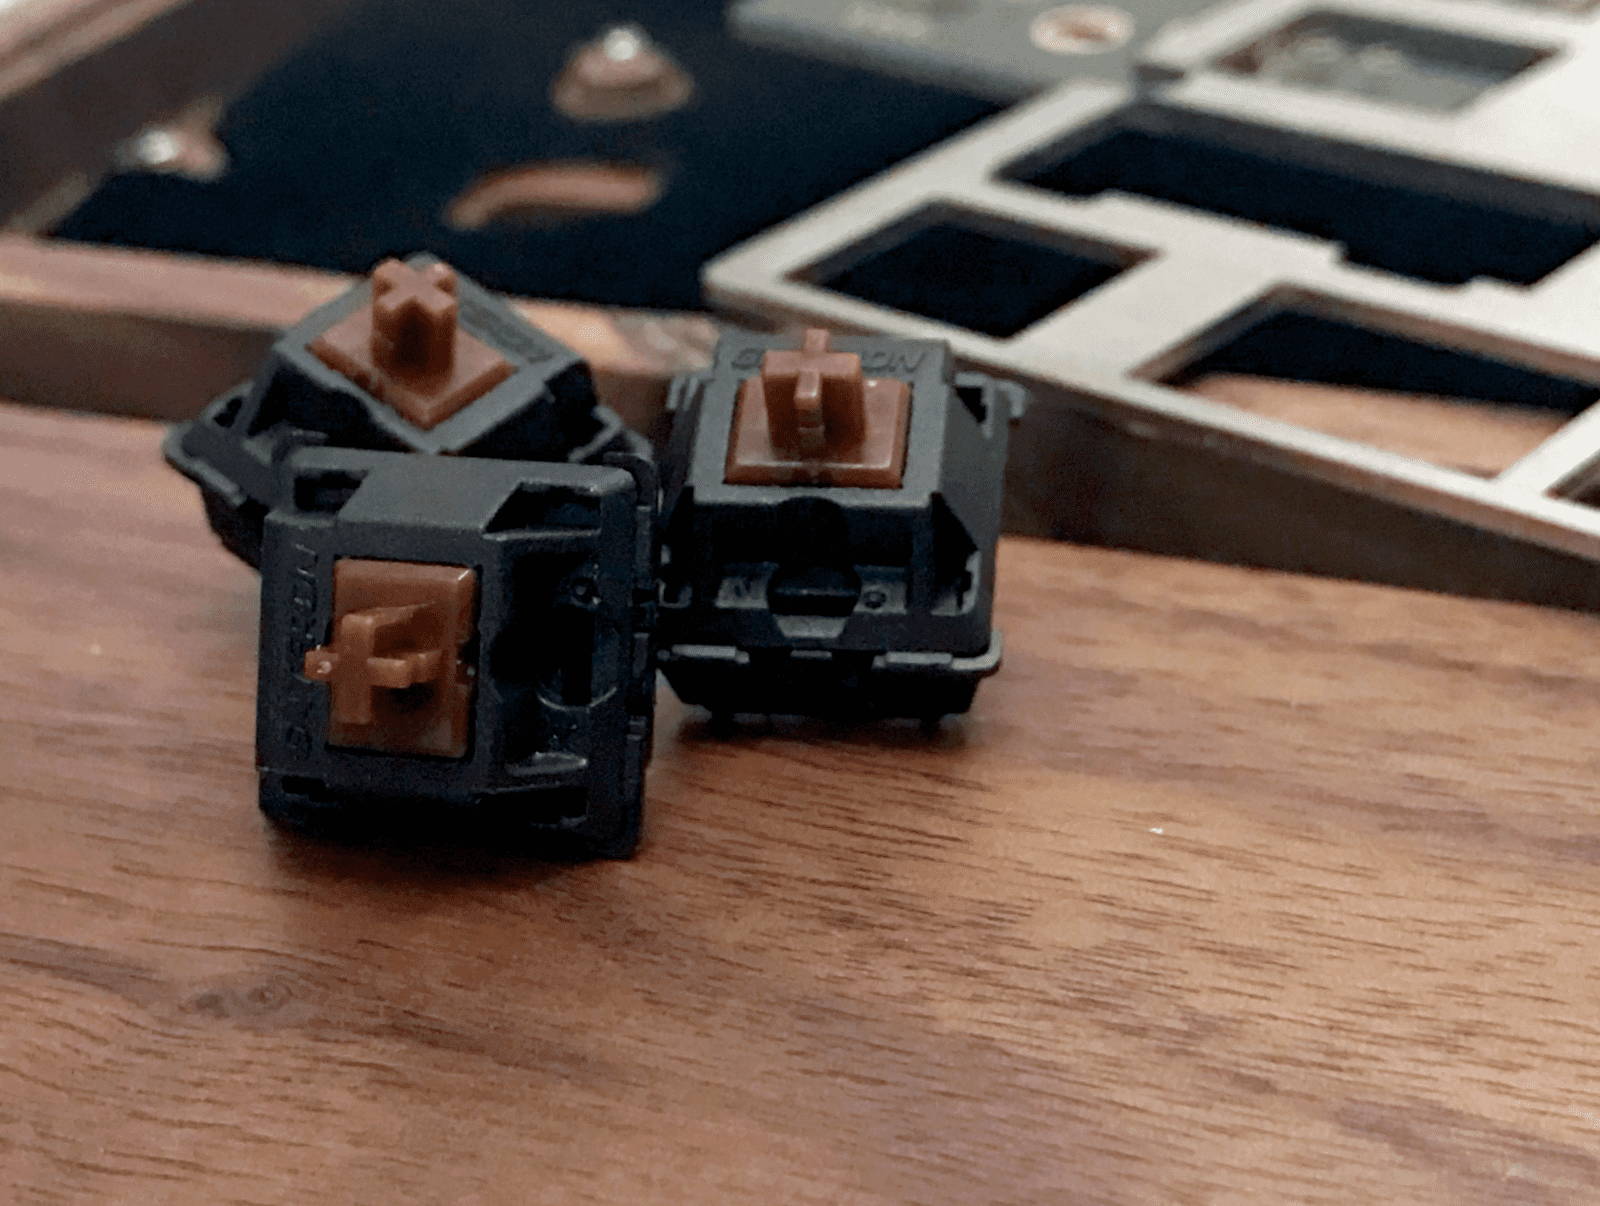
Gateron Silent Brown MX Switches
Switches. The item that defines the biggest characteristic of a mechanical keyboard. And in my case, one of my compromises. Now that the board is built, I'm happy and there is zero disappointment with my choice. Of course, it would have been nice to have bought the ZealPC Zilents in 62g, but with a price of nearly 3x the price of the Gaterons, I couldn't justify it... At least not on my first build.
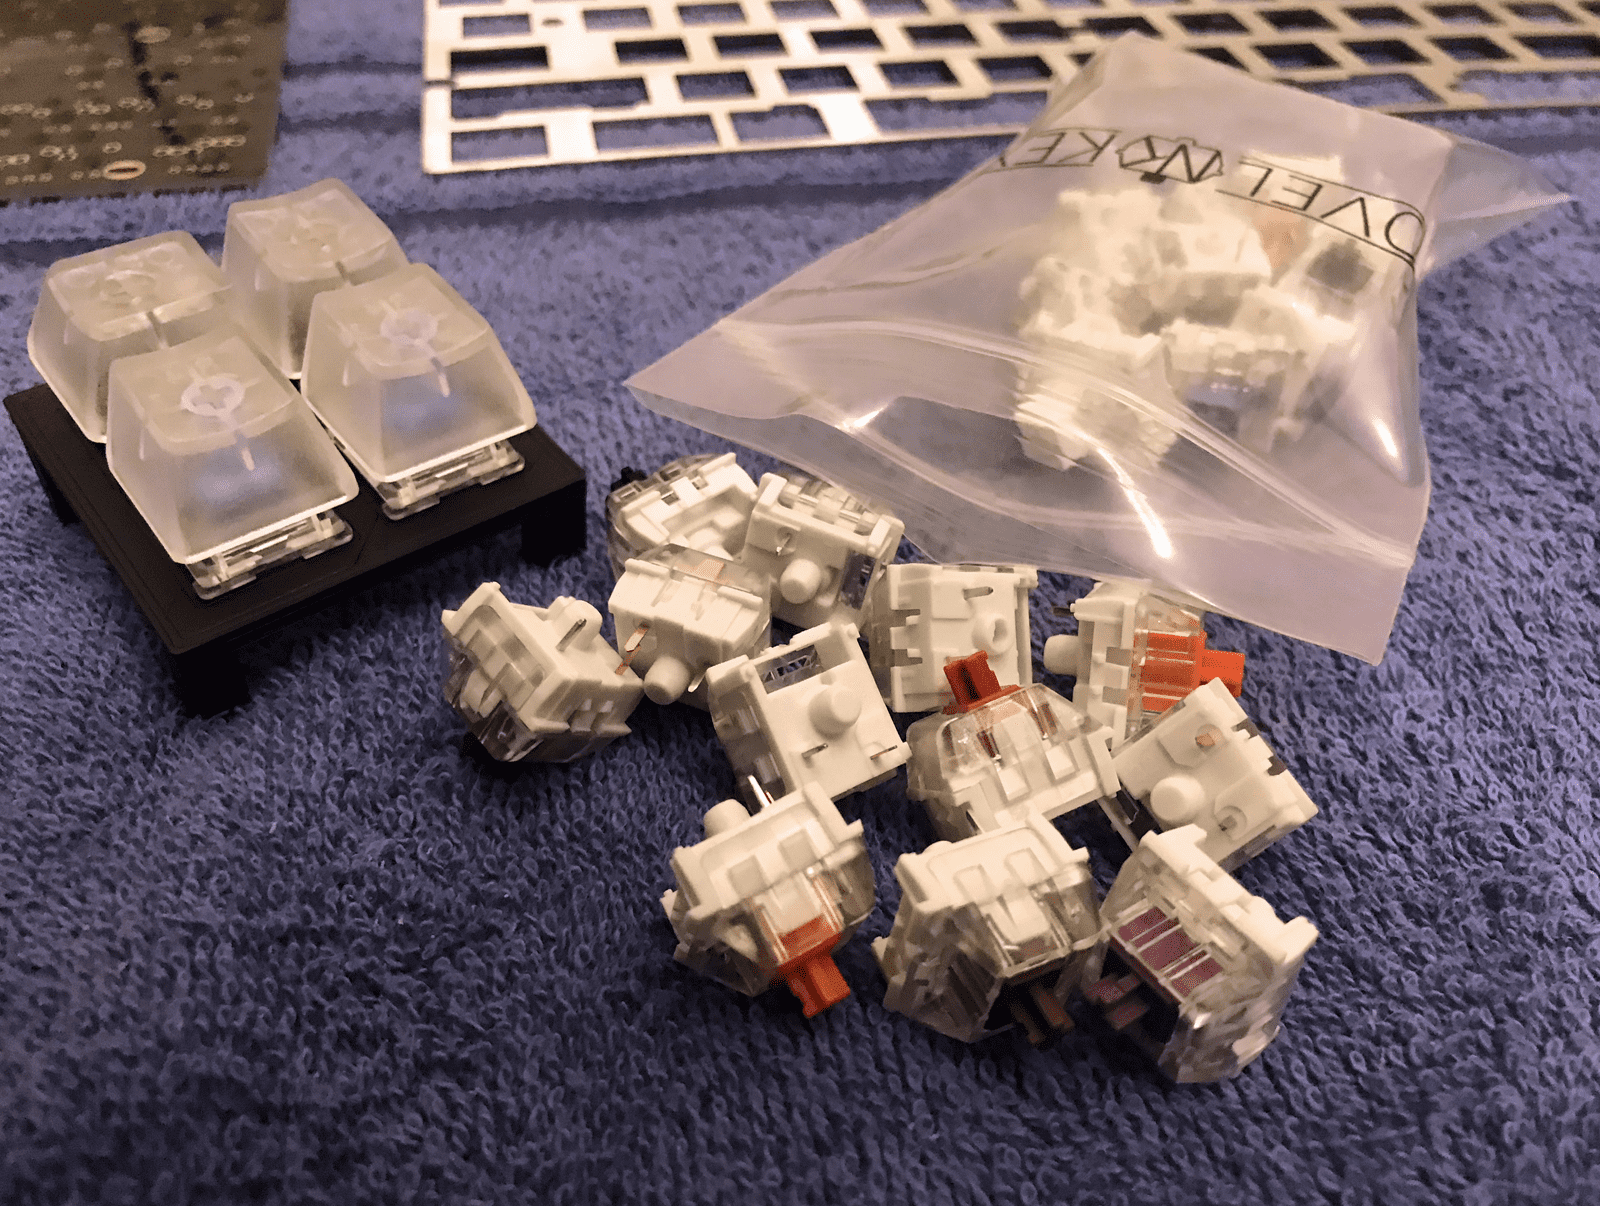
Before I settled on the Gateron Silent Browns, I ordered a lot of sample switches. Most were Kalhi, but I threw in two Zilents and two Gateron Silents. No question, the Zilents were the best feeling tactile I got. As soon as I clicked the switch, I was like, that's the one. At this point, I didn't realize the price difference. Needless to say I was bummed.
On a side note, one thing I really loved about the Gateron Silents vs the Zilents, was the fact the switch bodies are black and not clear. I get it, clear helps with LEDs, but my case (details below) isn't really led friendly and the LEDs on my PCB are on the bottom. The reason I like the black though is because I knew you'd be able to see under the caps. I wanted it to be blacked out, the same reasoning behind blackening the stainless steel plate. To be clear, if the Zilents weren't so expensive, I would have still got them regardless of the clear housings.
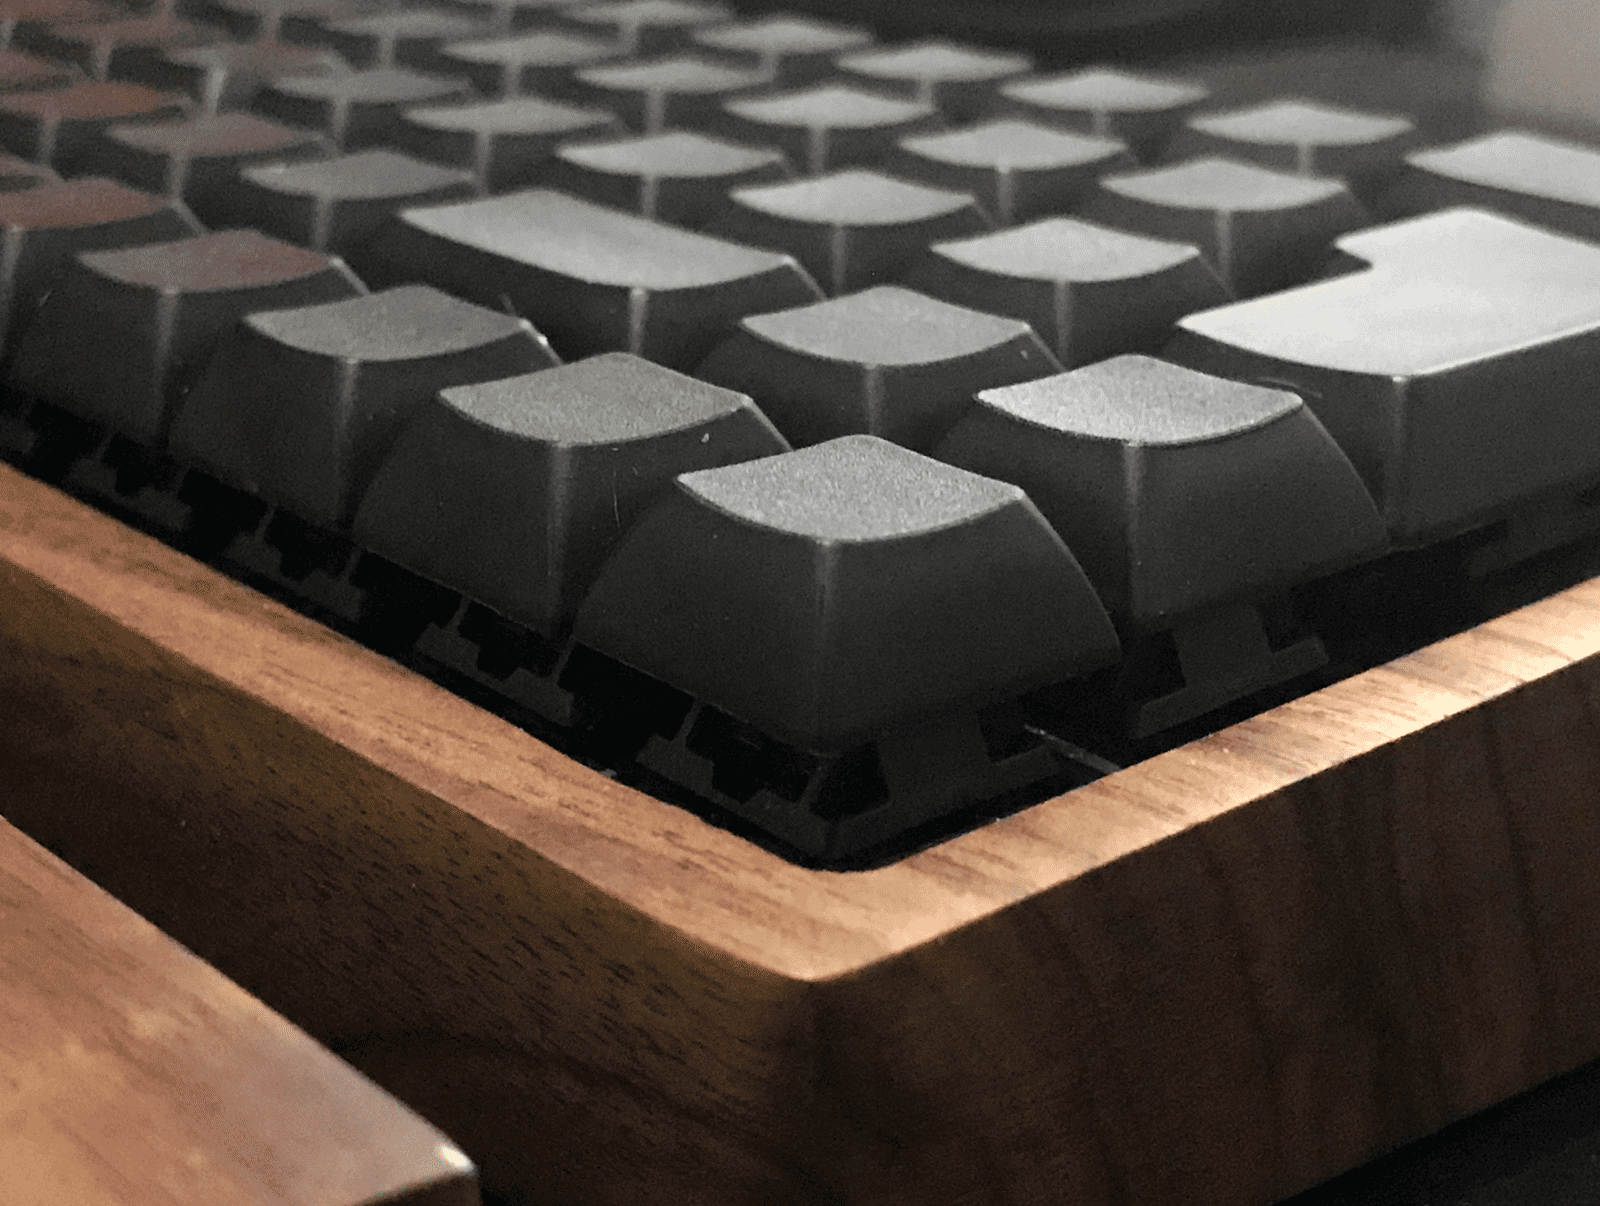
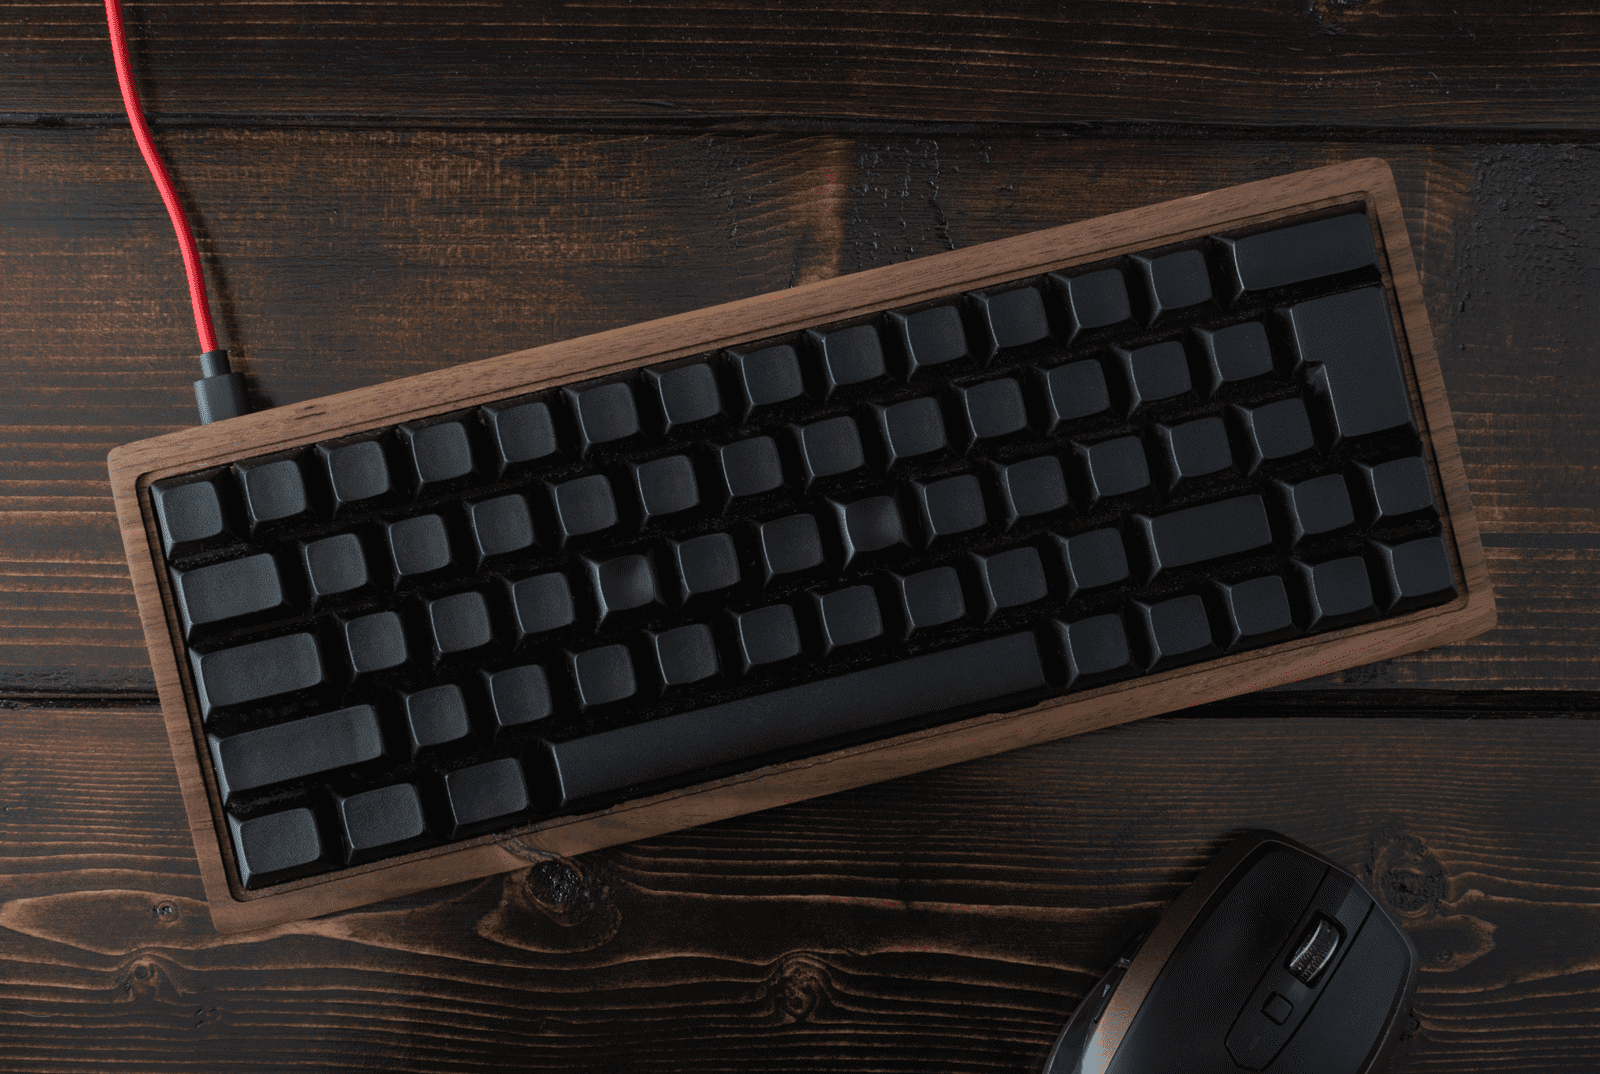
Dark Walnut Wooden Case and Wrist Rest

I got hung up on the case. It was actually the last thing I ordered. I couldn't find what I really wanted. Some that were close, but nothing exact. Well not that was in stock anyway. Those Royal Glam cases from a previous Massdrop look amazing.
I toyed with the idea of designing my own case, but knew that had a ton of its own challenges. Plus, I knew that it probably wouldn't be cheaper then buying one online due to trial and error. In the end, I opted to get a wooden case from NPKC on Amazon. I was rushing to decide on the case because Chinese New Years was days away and I didn't want to miss my shipping window before the country closes for a couple weeks.
I chose this one, even though its basically the same one as the one on KBDFans and Banggood, because I could order it through Amazon. Why that mattered, I'm not sure, but it was also cheaper then the KBDFans version. Which wasn't available on their Amazon store.
The case and rest look amazing. I could only be happier if the case would have higher sides to hide the underside of the caps. Though it doesn't look as bad as I thought it would. Perhaps because I blackened the plate and got black housed switches, lol. As for the wrist rest, I found that I don't use it. Should I? Well that's a different question, but it felt like clutter. So I drawer'd it.
PMK PBT DSA Black Blank Keycaps
The biggest compromise I had to make involved the keycaps. I am certainly the reason for this because I am a mac addict and wanted a non-traditional layout, as I mentioned earlier. I wanted PBT caps, but I had settled on custom uv printed ABS caps from WASD. Again, having an odd layout, I decided to reach out to them before placing an order to see if they could do what I wanted. They responded within a couple hours and informed me it was possible, but my right shift (1.75u) wasn't a key that they carry in black. The closest was charcoal.
So my options were, 1. have all black caps with an odd ball charcoal or blue or something like that. 2. change all my caps to charcoal. or 3. use a black caps lock key (wrong row) for the shift and deal with that mismatched height. I didn't like any of these options.
I ended up going with a fourth option. Go a completely different route. Which meant giving up my custom printed legends and unless I wanted to search for months for the perfect set, with mac legends, I'd have to give up legends all together. It's tbd if this will be a problem. Turns out, it was in fact a pain in the butt to use a keyboard without legends. Technically, it still is, but I've gotten a lot better at it. I am using it to write this now.
The caps I went with came from Pimp My Keyboard and are their PBT/DSA blank caps. Which have a uniformed height. I was and still am curious about the heights. Coming from a flat laptop keyboard, I'm not sure if I'd like a sculpted set or not. The WASD keys were/would have been sculpted, but I don't know which profile. Guess I'll figure it out one day. Update: I don't care. Lol. I have now used other key profiles, those of which I don't know what they are, but I don't have trouble typing on any of them. I'm sure some of the extreme profiles may be noticeable, but I really don't notice it on the ones I have. Perhaps I'm alone on this though.
The Build

The build process went pretty good actually. I was worried. Hell at one point, I felt like I was making excuses to put off building it. It may be from fear of messing it up and wasting money. I'm not sure, but once I got the process going, it went pretty quick.
By now, I had watched several live builds, by several different YouTubers and I pretty much followed their lead. I started by clipping the PCB pins on all the switches. Tedious, but painless. Once that was wrapped up, I moved on to the stabilizers. I disassembled, lubed and reassembled them. Then I began attaching them to the PCB.
Goof #1: After installing the first stabilizer, it just fell off the PCB. WTF? Oh, wait... they should be screwed in from the bottom dumb ass. Guess that explains it.
Goof #2: I couldn't get the space bar stabilizer to fit in the holes. I eventually came to the conclusion that the board was messed up and had the wrong size holes. Nope! The space bar stab is flipped around compared to the others. Worked like a charm, go figure.
After getting the stabs in place, I began sandwiching the plate and PCB with the switch for the escape button. Followed by the other three corners. These switches were all soldered in place first to keep everything aligned. Then I began the task of popping all the switches in place. I took my time with the bottom row and the right shift area. As those had the most options and in turn, the most opportunity to mess up.

Now it was time to do the thing. The thing I've dreaded since the beginning... soldering all those pins. Now that its over, I don't know why I was so worried. It went pretty smooth. Just like with the build, I watched several videos about through-hole soldering, none of which were keyboard builders. I managed to get all the switches soldered in successfully... all without making the sky fall.
I had most of the keycaps in place by the time I had finished the soldering. Mostly because of the alignment worries I had on the bottom row and right shift area, but also for balance of the board. I had a bit of trouble finding the 'domed' caps for the f and j keys. The difference is very very subtle. Regardless, seeing it finally come together was very rewarding... at least until I noticed my goof.
Goof #3: The second switch I soldered (the bottom left key) was in the wrong position! NOOOOOO! This required solder wick, which I had to order. To keep it short... desoldering sucks! After the first fail, I re-solder the bad pins and desoldered them again. The second time working out.
I wasn't about to wait on the solder wick to finish the build. So I slipped the board into the case and attached it with a couple screws. Which was a pain in the ass. These are some tiny screws and they do not react to a magnet. At first I thought it was just the screwdriver, but even after using the trick of rubbing the drivers tip on a magnet, they still didn't hold. I had to use a combination of tweezers and a screwdriver to get them in place.
A side note, the two outer screws, the ones on the side walls, were pointless. The screw heads were smaller then the hole in the PCB, so they are just there. The other screws hold it securely though, so it's a non-issue.
Looking at the keyboard, completed, with keycaps and in its case was awesome and it looked that way too. I was so happy it was done, but now for the ultimate truth... does it work? After hooking it up to my computer, I logged on to the keycap tester and went through the keys. Success! Okay, sort of a success. The PCB is still running the factory firmware, so some of the keys didn't register, but I knew this and wasn't worried.
The Firmware
This is one area I didn't do much research on before hand. I did look up the software being used by the boards I was looking at and decided I would prefer a board with QMK. The DZ60 does in fact run QMK. I began with the docs, where you should always start and noticed it was a bit involved. Having to install stuff with Homebrew (macOS) seemed extreme and I thought I had read about some kind of GUI that didn't involve coding.
I then turned to everyone's friend, Google. Which is where I found the QMK Configurator. I followed a guy on YouTube as he walked through the process. I choose the board, layout and assigned all my keys and layers. Then using the QMK Toolbox, I flashed the board, just as the guy did on the video. Even though I went step by step with the video, when I tried to use it, nothing. I mean absolutely nothing. No keys worked. Oh crap!
One might freak out at this point, but I wasn't too worried. Though I'm not sure why. I then turned to the docs and started at the beginning. I followed every step they provided, installed the package from Homebrew, etc, etc. The install includes a lot of key-maps for a lot of boards. Each board having lots of layouts. The docs say to use the default key-map to work from and I did just that.
Doing it this way meant that I had to get the key-codes for QMK. Not a big deal because during the QMK Configurator phase, I downloaded a json file of the layout I created on it. Now json isn't the correct format, but it has the key-codes I need. After some copy and pasting I had it ready. The QMK Toolbox is required for this method as well. It's the program used to compile the firmware file.
Flashing was different then the time before. There was more feedback in the toolbox console. Which felt like a good thing. I then tested the keyboard out and it worked! Awesome! Wait... nope, thats not right. Oh, neither is that. Oh damn, everything's screwed up!
So, yes the flash worked, but seems the default file was not where I should have started. I then started looking at all the key-map files provided for my board. I found the one that matched my layout the closest and I used it as my base. It was a lot fancier then the default. Not as fancy as some, but it had the keys formatted in a much easier way to read (within the file). The fancier ones, had the layout visually shown in commented code.
After I finished updating the file, I ran the file through the QMK Toolbox again and received the same feedback from the app. Things are looking good. I pulled up a text file and tested each row. Success! Success! Success! And this time, it was a real success.
Granted, at this point, I still had a wonky bottom left (ctrl) key. Not wanting to not use my new fancy keyboard, I just popped on a 1u cap until I was able to fix my goof. I only had to suffer at the eye sore (lol) for two days. As I mentioned, desoldering was not fun. I'm pretty sure I destroyed the switch in the process, but I finally got it off and swopped out.
Conclusion
Now that its over and I've had some time using it, I love it. Do I wish it was cheaper to do, absolutely, but I am very pleased with it. I was worried the finished product wouldn't look 'high end', but I was wrong. Its a solid, sleek looking board and it's not loud and annoying to my coworkers, which was one of my main worries when picking out switches.
So, where do I go from here? Well, I would love to find some dark walnut keycaps in a DSA profile for the escape and arrow keys. Aside from that, I think this board is a wrap. Will there be another.... hmmmm.... maybe, but the thought of spending that amount of money again, really scares me away from the idea. However, that's not to say I'm not going to be keeping my eye on Massdrop for a 'deal'.
Happy building!